[N-World Contents] [Book Contents] [Prev] [Next] [Index]

File and Edit Menus (cont.)


Open

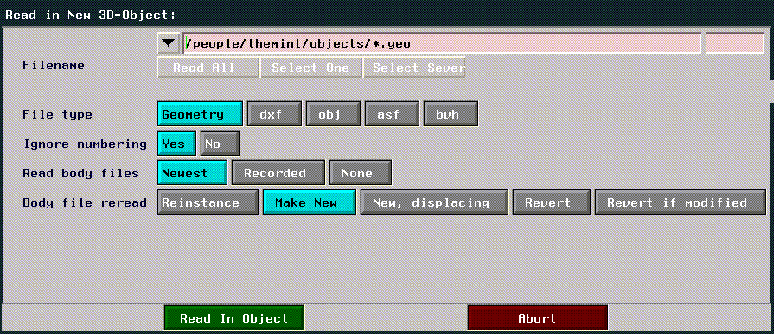
Loads an object that has been saved to file. To display the Read in New 3D-Object menu, (CLICK-L) on File>Open.

Figure 2.66 Reading in a 3D object

The following parameters can be specified when reading in a file:

Table 2.7 Parameters when reading in a file
Parameter Type Description
Filename

Specifies the pathname of the file to read. Filenames without extensions default to .obj, and the program notifies you when it cannot find a file with the name you supplied.

Read All

Reads all objects in the specified directory of the file type specified in File Type.

Select One

Displays a list of objects in the specified directory, and lets you pick one object to load.

Select Several

Displays a list of objects in the specified directory, but lets you select several objects to load.

File Type

Determines what type of object is being read in.

Geometry

N-Geometry's native format (and are given a .geo extension).

dxf

AutoCAD format.

obj

Wavefront format.

asf

Acclaim format (skeletons).

bvh

BioVision format (skeletons).

htr

Motion Analysis format (skeletons).

All

Lists all file types in the object list.

Ignore
Numbering

Specifies whether or not to pay attention to the internal numbering of an object file. The internal numbering is sequential, starting at 1 for each type of element, and is provided to make it easier for you to read the text file. Internal numbering is usually ignored to speed up read-in, but it might be advisable to turn off Ignore Numbering when you have hand-modified or have otherwise altered a saved object because the numbers no longer correspond to the positions of the modified elements in the listing.

Read body files

Specifies which body files are to be used when reading in an object.

Newest

Uses the newest versions of all separately written body files.

Recorded

Uses (possibly) older versions of body files that were current when the original object was saved.

None

Skips reading any body files. Dummy or reinstanced bodies are substituted for the body files.

Body File Reread

Facilitates handling of binary body files already read into N-Geometry. Lets you specify the actions N-Geometry should take when it encounters an object that references a body that has already been read. This new menu item gives you a choice of five options:

Reinstance

Reuses the existing body (this is the default).

Make New

Makes a copy of the body. When the copy is saved, it is written to a different file.

New, displacing

Makes a copy of the body and gives the copy the original filename. When the original body is saved, it is written to a different file.

Revert

Re-reads the file and replaces all current instances of the body with the data on file.

Revert if
modified

Replaces all instances of the body with saved data only if the body has been modified; otherwise it acts like Reinstance.


Save

File>Save saves the N-Geometry object as a file on the file system of any connected file server host. This is the only way to save an object for use at another time.

Figure 2.67 Selecting objects to be saved

The save menu looks like this:

Figure 2.68 Saving objects

Table 2.8 Parameters for saving objects
Parameter Type Description
FILENAME

Specifies the name of the file to be written. N-Geometry now forces this name to be the same as that of the object. If necessary, N-Geometry replaces certain characters so that the filename is valid.

Object name

The name of the object. Changing this value renames the object and changes the filename.

Write-out units

The units in which the object's coordinates are saved. Changing this value scales the object coordinates correspondingly. The default is the current global unit.

Documentation

A brief description of the object, included at the beginning of the .obj file. This comes in handy when you write multiple versions of the same large file. You then need not load a file to find out which version it is; instead, type the following command at a LISP Listener:

Show File <filename>

Separate body files?

Saves an object in N-Geometry format, and lets you choose one of four formats in which to save the object:

No

Writes in the old style .obj format, writing one large ASCII text file for the entire object.

Text

Writes one .obj file, plus a .body file and a .tbd file for each terminal object.

Binary

Writes each body in binary format, creating .body and .bbd (binary body descriptor) files for each of the object's terminal objects. Saving objects in binary format creates smaller files that can be written and read faster. When you save an object in binary format, N-Geometry writes three types of files: one .obj file, plus a .body file and a .bbd file for each terminal object in the object group.

A .body file is a short text file that contains the name of the flavor of the body, a list of the .obj files that refer to the body (multiple objects or versions can refer to a single body), and the versions of the body files that were current when the .obj file was written.

By default, N-Geometry stores the .body, .bbd, and .tbd files in a directory called Bodies, which N-Geometry creates as a subdirectory of the directory where the objects are stored.

For example, suppose you are restructuring two objects, cube and cube[2], into a new object named cube-group and stored in the /cube directory. N-Geometry stores the top-level object file, cube-group.obj, in the /cube directory but stores the .body and the .bbd files in /cube/bodies.

History

If you turn the History option on, you save the sequential list of procedures that were used to get the object to its current state.

If you read an object back in that was saved with history, you can use the Rebuild function to step through the rebuilding process. See the section "Rebuild," on page 2-64 for more information.

Number
elements?

(for Text
format only)

If selected, writes the number for each element as part of the file.

Faces by
vertex?

(for Text
format only)

If selected, write vertex numbers for each face on the object as part of the file.

The various parameters on the Save dialog are described in the table below:


Export

If you want to save an object in a format other than N-Geometry's native format, you should use the File>Export command. If you choose this option, a dialog box showing the various supported export formats is displayed:

Figure 2.69 The Export menu

Note. Not all formats support all the functionality of geometry's native format.

For example, if your object has displacements or GL Shade parameters assigned to it, it must be saved in N-Geometry's native .geo format with the
File>Save command. Non-native formats do not support these features.

Each of these formats is described in the sections below.

Exporting AutoCAD DXF

To export the object as in DXF format, choose AutoCAD DXF. You can (CLICK-L) on the Objects text edit box to specify which objects are to be saved:

Figure 2.70 Saving an object in AutoCAD DXF format

Exporting Wavefront OBJ

To export the object as an OBJ format, choose Wavefront OBJ. You can (CLICK-L) on the Objects text edit box to specify which objects are to be saved. You can also specify whether the object is to be saved in its transformed state.

Figure 2.71 Saving an object in Wavefront OBJ format

Exporting Acclaim Skeletons

To export a skeleton object in Acclaim format, choose Acclaim Skeleton. You can (CLICK-L) on the Objects text edit box to specify which skeletons are to be saved:

Figure 2.72 Saving a skeleton in Acclaim format

Exporting Biovision Skeletons

To export a skeleton object in Biovision format, choose Biovision Skeleton. You can (CLICK-L) on the Objects text edit box to specify which skeletons are to be saved:

Figure 2.73 Saving a skeleton in Biovision format

Exporting HTR Skeletons

To export a skeleton object in Motion Analysis' HTR format, choose HTR Skeleton. You can (CLICK-L) on the Objects text edit box to specify which skeletons are to be saved:

Figure 2.74 Saving a skeleton in HTR format

Exporting Sony RSD

To export the selected object as in Sony's RSD format, choose Sony RSD. You can (CLICK-L) on the Objects text edit box to specify which objects are to be saved:

Figure 2.75 Saving an object in Sony's RSD format

For more information on the Sony RSD format, refer to the PlayStation Express User's Guide.

Exporting Nintendo 64

To export the selected object as in Nintendo's native format, choose Nintendo 64. You can (CLICK-L) on the Objects text edit box to specify which objects are to be saved:

Figure 2.76 Saving an object in Sony's RSD format

For more information on the Nintendo format, refer to the Nintendo Express User's Guide.

Exporting Sega SGL

To export the selected object as in Sega's SGL format, choose Sega SGL. You can (CLICK-L) on the Objects text edit box to specify which objects are to be saved:

Figure 2.77 Saving an object in Sega's SGL format

For more information on the Sega SGL format, refer to the Sega Express User's Guide.


Get

Brings an object from the LISP world into the N-Geometry environment. This element appears on the GeoMenus only if you are running the N·World Devo Kit (Wide Open World).

Figure 2.78 The Get Object menu

Since you normally create and modify objects entirely within the N-Geometry environment, you probably will not select this menu item.

Note. You'll need to use this only if you're familiar with LISP environment and want to create custom objects.


The Edit Menu

The GeoMenus>Edit menu lets you do all of the following tasks:

The GeoMenus>Edit menu looks like this:

Figure 2.1 The Edit menu

Each of the options on the File menu are described in the following sections.


Copy

Creates a new object that is an identical but discrete copy of the original. See the section "Objects," on page 1-4.

Figure 2.2 Other copy options

Each of these options is described below.

Reinstance

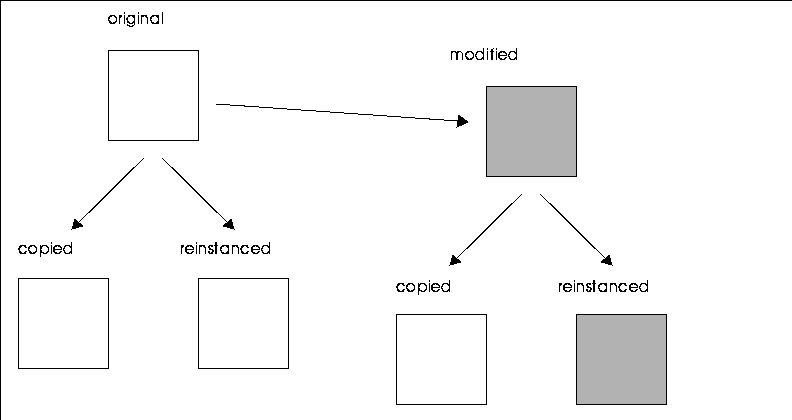
Creates a new object that shares the body of the original polyhedron. Any change to the first object is automatically reflected in the new object.

(CLICK-R) on Copy to reinstance an object.

Figure 2.3 shows a cube that was copied once and reinstanced once. Only the reinstanced cube reflects the modification to the original.

To create multiple reinstances of an object, see the Multiply section below.
Note. Why Reinstance? Reinstancing objects takes considerably less memory than copying, since only one body is shared by multiple objects. If you're working on a very complex scene, you may want to consider using reinstanced objects.

Figure 2.3 Left, copied and reinstanced cube; right, only reinstanced cube is affected by body modification

Multiply

(CLICK-R) on Copy to multiply an object.
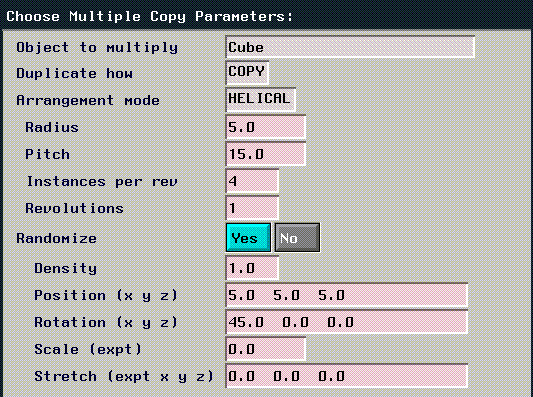
Multiply either copies or reinstances a specified object; the positions of the copies or instances are based on the input you provide through the following dialog box:

Figure 2.4 Multiply dialog box

The following parameters can be specified when generating a grid:

Table 2.1 Multiply parameters
Parameter Type Description
Object to
multiply

The object to be copied

Duplicate how

Method is used to duplicate the original (selected from the options described below).

Reinstance-Copy

Makes a copy of original, then reinstances that copy so the original object can be modified without affecting the generated lattice.

Copy

Makes copies of the original.

Reinstance

Makes new instances of the original.

Arrangement mode

Layout of the new objects

Linear

Positions the copies in a single row (along the x axis).

Planar

Positions the copies along the x and y planes.

Cubical

Positions the copies along the x, y, and z planes.

Helical

Positions the copies along a helix (like a bed spring) of the specified dimensions.

Radius specifies the radius of the helix.

Pitch specifies the angle of the helix.

Instances per rev sets the number of duplicates that appear on each revolution of the helix.

Revolutions specifies how many times the helix wraps around its own axis.

Per vertex

Positions the copies along the vertices of a specified object. (So, for example, four smaller cubes could be created on the corner of a larger cube.)

Number of
copies

The number of duplicate objects to create. If more than one value is specified, enter the number of duplicates to create along each axis (x, y, and z).

Spacing mode

How the copies are spaced.

Abutting

Puts the amount of space specified in Interobject spacing between the edges of adjacent generated objects.

On centers

Puts the amount of space specified in Object centers between the centers of adjacent generated objects.

Randomize

Controls "randomizing" effects used when generating multiplied objects.

Density

Number of objects are created along the specified path or lattice.

For example, if you selected Linear for arrangement mode, 10 for Number of copies, and .5 for Density, only five duplicates would be created. (A smaller or larger number would produce a lower or higher density of coverage.) The duplicates would appear in random positions along the imaginary lattice.

Position

Jogs the position of the duplicates, giving the generated pattern a more random appearance.

For example, if you created multiple copies of a cube using a linear arrangement and specified a position value of 10, each duplicate could be +/-5 units from its "default" position.

Note. Because you can specify position values for each of the x, y, and z planes, you can get cubical effects even if you choose a planar arrangement.

Rotation

Similar to Position, except that it specifies rotational limits for each duplicate. A higher value allows more rotation; you can specify the range of rotation for duplicates along the x, y, and z axes independently.

Scale

Scales generated duplicates, using scaling factors between 0 and the specified value. The higher the value, the larger the maximum size. Scale can be specified independently in the x, y, and z plane.

Stretch

Stretches generated duplicates, using stretching factors between 0 and the specified value. The higher the value, the more "stretch" allowed. Stretch can be specified independently in the x, y, and z plane.

Figure 2.5 shows the results of multiplying a cube using planar arrangement mode, with six copies in the x direction and four in the y, with randomized rotation limits of 45, 45, and 45, and a randomized scale of 2.0:
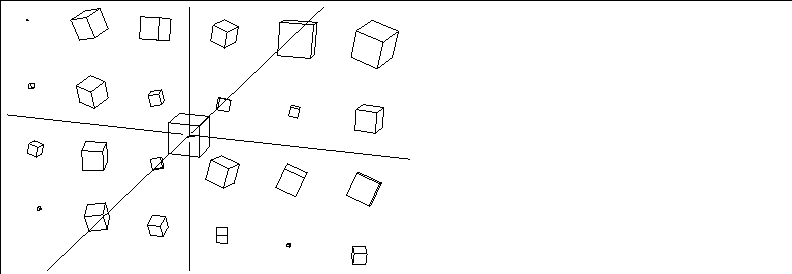
Figure 2.5 Multiplied copies of a single cube using planar copy

Note. Copies of the object are positioned based on the orientation of the
original object.
Note. The generated duplicates are grouped together as one object in the object hierarchy; (CLICK-R) on an object in the object list to view its inferiors.

Also refer to the N-Geometry Tutorial for several examples of using Multiply to create other, more complex objects.

Rebuild

Rebuild lets you build a copy or partial copy of an existing terminal level object; the rebuild process goes through each step that was used in creating the original object, so that you could, for example, recreate an object as it existed at its halfway point.

Figure 2.6 The Rebuild menu

If you set the Step through option to Yes when you (CLICK-L) on Rebuild, a second, smaller dialog box appears:

Figure 2.7 Stepping through the rebuild process

(CLICK-L) on Do It to execute each step performed to build the selected object, and (CLICK-L) on Stop when you're done. In the list of objects, the rebuilt object appears as "Rebuilt Object" (where "Object" is the name of the original object).

Note. You may find it helpful to turn the visibility of the original object off so that it doesn't interfere with your view of the new object as it is being rebuilt.


Edit Body

The Edit Body command lets you edit the body of an object that is currently loaded into N-Geometry. This is equivalent to selecting bodies on the element sensitivity menu then using (SHIFT-L) on the body; however, there are times when, for example, the body is invisible or is simply beyond the edge of the N-Geometry window, and you'll need to use the Edit Body command.

To edit the body of an object:

1. (CLICK-L) on Edit Body.

An object list appears, displaying any objects currently loaded into N-Geometry.

Figure 2.8 Object list

2. Select the object from the object list that appears.

The body modification menu for the selected type of object is displayed.

3. Select the command you wish to execute.


Edit Object

The Edit Object command is similar to the Edit Body command described previously; however, with this command, you edit object itself rather than the body. This is equivalent to selecting objects on the element sensitivity menu then using (SHIFT-L) on the object; however, there are times when, for example, the object is invisible or is simply beyond the edge of the N-Geometry window, and you'll need to use the Edit Object command.

To edit the body of an object:

1. (CLICK-L) on Edit Body.

An object list appears, displaying any objects currently loaded into N-Geometry.

Figure 2.9 Object list

2. Select the object from the object list that appears.

The body modification menu for the selected type of object is displayed.

3. Select the command you wish to execute.


Delete

Deletes an object and permanently removes it from the N-Geometry environment.


[N-World Contents] [Book Contents] [Prev] [Next] [Index]

Another fine product from Nichimen documentation!

Copyright © 1996, Nichimen Graphics Corporation. All rights reserved.