[N-World Contents] [Book Contents] [Prev] [Next] [Index]
Stadium
This chapter describes a simple technique for building a complete low-polygon count stadium environment in only a few steps.
In this Chapter
In building this object we'll learn some new techniques, plus expand on some we learned before:
Sketching the Contour Wire
A contour solid is a polyhedron created by scaling the cross section out to the contour. There are three basic steps in creating a contour solid:
Building the Contour Wire
In this section, we'll build the path wire. The path wire defines the "dimensions" of the stadium.
Try this:
1. (CLICK-L) on GeoMenus>File>New Object>Contour Solid.
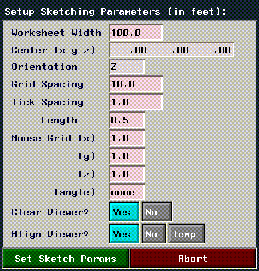
Figure 15.1 Sketch parameters
- Each of the parameters on this menu is described in detail in the N-Geometry Reference Guide.
- For now, change only the following parameters:
2. (CLICK-L) on the Set Sketch Params button.
- The Sketch Editor opens in the N-Geometry window. The target shape for the wire is shown in Figure 15.2:

Figure 15.2 The finished wire-refer back here if you need to
- In this exercise, it's not critical that you get the shape exactly right; just make sure that you start the wire on the Y axis and end it at the global center.
3. To start the wire, move the cursor straight up the Y axis.
4. (CLICK-L) to place node right on the Y axis.
5. Move the cursor to the right, then (CLICK-L) again.
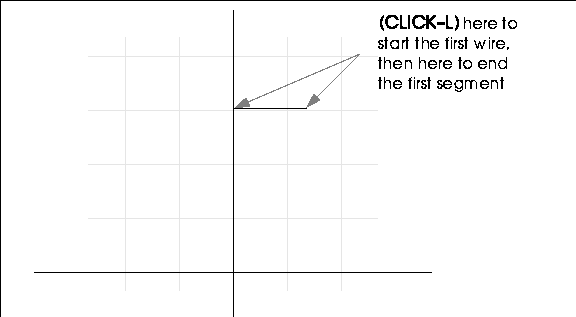
Figure 15.3 Starting the wire
6. (ALT-L) and move the cursor straight down.
- You use the ALT key to start an arc in the sketch editor. Move the mouse straight down and (CLICK-L) again to define the arc:
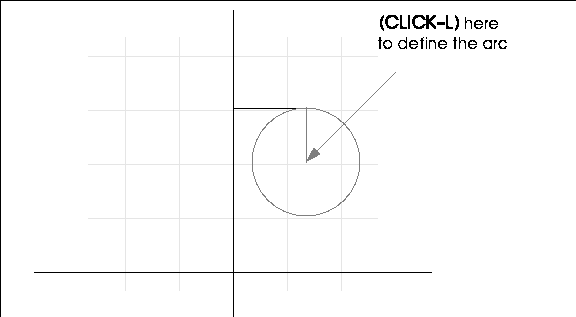
Figure 15.4 Defining the arc
7. Move the mouse back up and (CLICK-L) as shown in Figure 15.5 to create the arc.
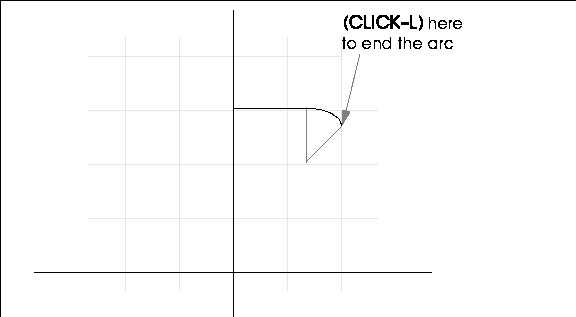
Figure 15.5 Ending the arc
You can complete the rest of the wire using (CLICK-L) to insert nodes wherever necessary.
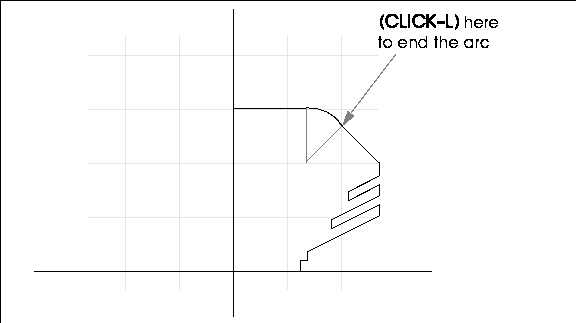
Figure 15.6 Completing the contour wire
8. (CLICK-R) after you draw the last node, then (CLICK-L) on OK.
Creating the Path Wire
After you (CLICK-L) on OK to complete the first wire, you're prompted to enter the drawing parameters for the second wire (the path the contour wire follows).

Figure 15.7 Parameters for the contour solid
9. Use the default parameters, then (CLICK-L) on Make Solid.
- The sketch editor appears again.
Now, we're going Let's assume that our arena is intended for either basketball or hockey. Try this:
10. Draw a wire in the shape of a hockey rink. Start with a node straight up the Y axis.
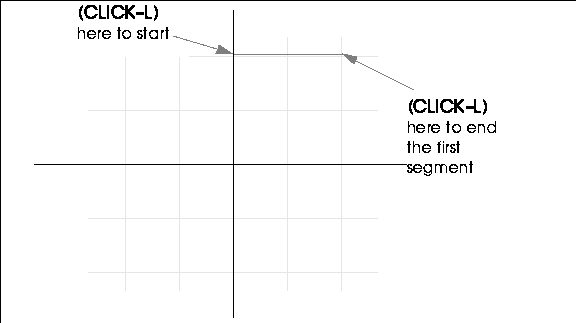
Figure 15.8 Completing the contour wire
11. Draw the arc for the first corner of the rink.
- Make the mouse clicks described in Figure 15.9 to complete the arc.
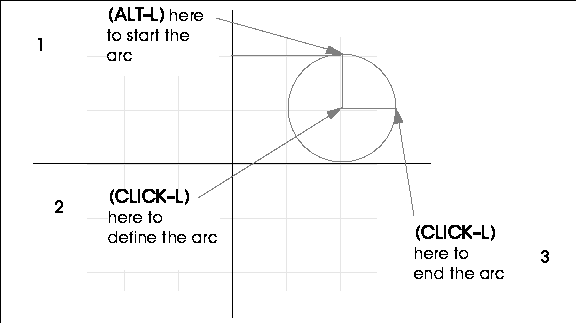
Figure 15.9 Completing the contour wire
12. Now, complete the rest of the wire until you have a wire that looks like this:

Figure 15.10 Completing the path wire
13. (CLICK-R) after you draw the last node, then (CLICK-L) on OK.
- The sketch editor goes away and the contour solid appears in the N-Geometry window.
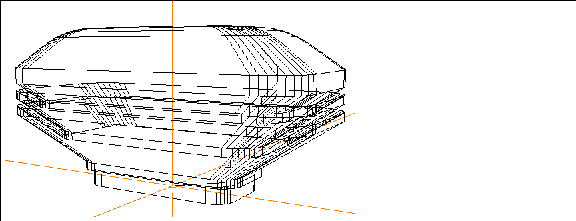
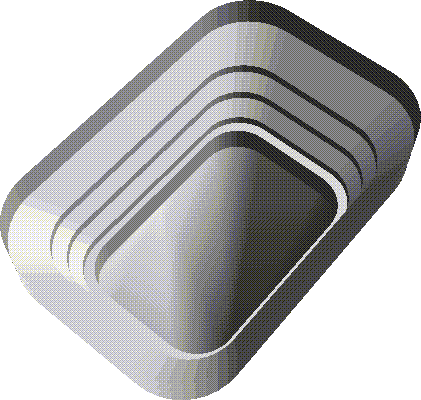
Figure 15.11 The completed stadium
14. (CLICK-L) on GeoMenus>Object Display>Shading.
- Pick the new object from the object list. The generated object is called "Consolid" by default, short for "contour solid."
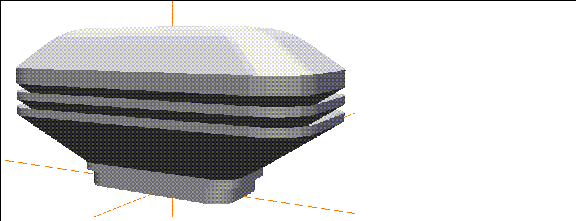
Figure 15.12 The shaded stadium
Going Inside the Stadium
The generated contour solid is a closed surface; all its normals are on the same side of the object, that is on the "inside" or the "outside."
If your object looks like it does in Figure 15.12, that is, it looks normal when viewing it from the outside, you need to evert the object before you go inside of it.
15. (CLICK-L) on bodies on the element sensitivity menu.
16. (SHIFT-L) on the stadium, then (CLICK-L) on Evert.
- The normals on the faces of your object are everted, or "flipped" to the other side. Everting the object will make it look "open."
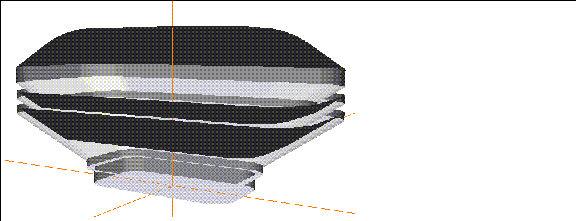
Figure 15.13 The everted stadium
- If you are looking at an everted shaded object, you may find it hard to identify which faces you are actually seeing at any given moment. This is because you are actually looking at the faces on the far side of the object (those whose normals are now pointing toward the camera).
While this may be somewhat confusing if you are looking at the stadium from the outside, it's likely that your action will take place on the inside of the stadium.
17. Press the "y" hot key so that you are looking straight down at the top of the stadium.
18. Adjust the camera so that it looks something like this:
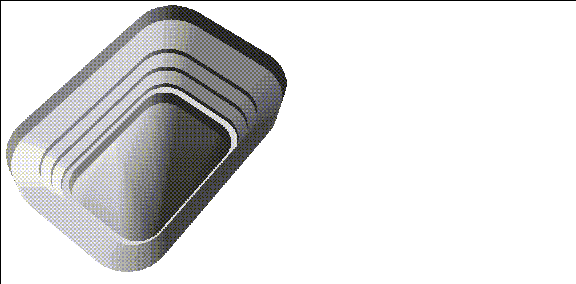
Figure 15.14 The everted stadium from above
You can apply textures to each area of the inside of your stadium, creating a complete environment for any sport.
Save your Work
Make sure to use the GeoMenus>File>Save operation to save your work.
Congratulations!
You've now completed an entire environment based on two simple sketched wires.
[N-World Contents] [Book Contents] [Prev] [Next] [Index]
 Another fine product from Nichimen documentation!
Copyright © 1996, Nichimen Graphics Corporation. All rights
reserved.