[N-World Contents] [Book Contents] [Prev] [Next] [Index]
Working with Curves
This chapter describes how to work with data in curve channels. Curve channels contain dynamic data that is used to execute operations with which the curve channel is associated.
Curves
Curves are channels that contain data only. Typically, a curve exists in a channel parallel to an action, and regulates how the operation is performed by that action over time.
There are any number of ways for you to modify the data in a curve channel: by specifying a value explicitly, defining the curve type used for the action, or even what kind of "treatment" is used on the curve.
A curve generally exists inside an action; that is, it's a subchannel to the action:

Figure 4.1 A sample action, showing associated curve data
The type of curve assigned to the action appears in parentheses after the name of the curve if the curve channel is closed:

Figure 4.2 A closed curve has its name and type in the channel's label
Curves may also contain cues. A cue is a marker that contains a value (either a simple value like a number, or a complex value like a pose or camera view). Values between cues are interpreted differently depending on the curve type specified for the curve. Cues appear as vertical bars across the curve channel:

Figure 4.3 Cues represent a value and time
Working with Curves
N-Dynamics lets you specify a variety of basic curve types. The curve type specified for an action can drastically affect how the associated action is animated.
There are a number of ways to work with curves:
Editing Curve Properties
To edit the channel properties of a curve, (CLICK-M) on the curve channel; the Edit Curve Properties dialog box appears:
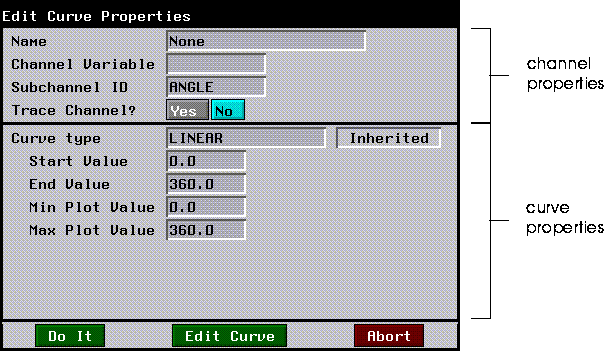
Figure 4.4 Edit Curve Properties dialog box
Note that the Edit Curve Properties dialog box is actually divided into two sections:
The parameters you specify for the curve channel are the same for any type of curve; the actual curve properties vary slightly depending on the type of curve you are editing.
Curve Channel Properties
A curve's channel properties are used for more script oriented tasks; that is, they don't affect the shape of the data curve directly, but rather how the curve channel is displayed in or used by the script.
- Name lets you specify the label name for the channel-this is the name that appears on the channel in the script editor. You may want to give a curve channel a descriptive name like "bell" or "big_noise" so you can find it quickly when looking at a script.
- Channel Variable lets you specify a name for the value of the curve over the length of the channel. You might, for instance, name the variable for an
X Rotate operation X-Rot. As the script executed, the value in X-Rot would change to reflect the value of the curve at that point in time. That variable could be referenced by other channels that could trigger actions when the value in X-Rot was of a certain value.
- Subchannel ID indicates the dynamic value contained in the channel. For example, if you are working with an XYZ Rotate operation, each subchannel is assigned a subchannel ID-the X Rotate, Y Rotate, and Z Rotate curves are each assigned a unique subchannel ID.
- Trace Channel? lets you display the value for the curve (at some point in the script) in the LISP listener window. If you turn this on, you can display the value of a curve over time, for example, as the script animates, or for a single frame by using (CLICK-L) on the frame range area.
The curve properties dialog box also lets you select the type of curve you want to use to animate the operation.
(CLICK-L) in the Curve type field to specify the type of curve you want to use:
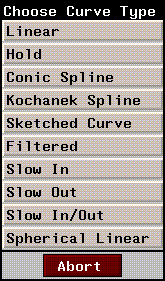
Figure 4.5 Curve types
The parameters for each type of curve are described in the section "Curve Types," on page 4-6.
There are three buttons at the bottom of the dialog box:
Curve Types
Linear Curves
A linear curve is one whose value changes from cue to cue in a linear fashion. If you use a linear curve, you specify the following parameters:

Figure 4.6 Linear curve parameters
A sample linear curve (one with cues only at the beginning and end of the channel), looks like this:

Figure 4.7 A sample linear curve
If you add additional cues to the curve, the value changes from cue to cue in a linear fashion:

Figure 4.8 A linear curve containing several cues
Hold Curves
A hold curve can be used to specify a constant value for the duration of the curve, or between cues:

Figure 4.9 Hold curve parameters
A sample hold curve (one with cues only at the beginning and end of the channel), looks like this:

Figure 4.10 A sample hold curve
If you add additional cues to a hold curve channel, the value remains constant until a new cue is reached:

Figure 4.11 A sample hold curve with several cues
Conic Spline Curves
Conic splines curves derive their shape from the cues in the curve. The shape of the curve behaves like a springy piece of material; by changing the tension on this spring both inside and outside the sequence, you can modify the shape. Conic splines do not pass through the value at the cue; they merely try to approximate it.
Conic splines can be manipulated by cue location as well as tension and end treatment.
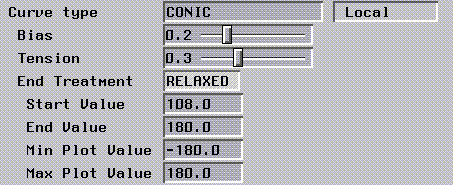
Figure 4.12 Conic spline curve parameters
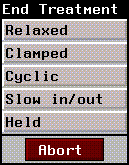
Figure 4.13 End treatments for conic spline curves
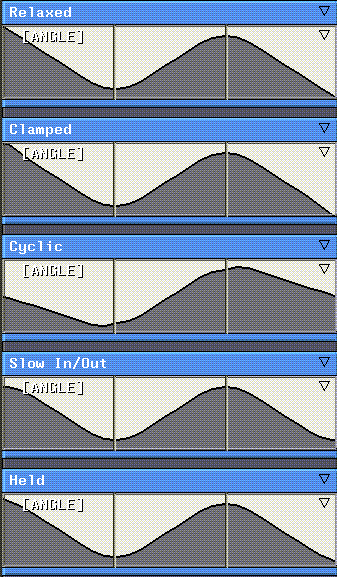
Figure 4.14 Sample end treatments
A sample spline curve (one with cues only at the beginning and end of the channel), looks like this:

Figure 4.15 A sample conic spline curve, with bias and tension set to zero
By changing the bias and tension of individual cues on the curve, you can change its shape:

Figure 4.16 The same conic spline curve with modified bias and tension values
Kochanek Spline Curves
The Kochanek curve is smoother than a conic spline and passes directly through the cue values. While smoother is generally better, a spline that passes through its cues is a mixed blessing. On one hand, it means that there is a direct and obvious relation between the cue values and the value of the curve at that cue-they are equivalent. On the other hand, there is the issue of "overshoot," which is an important difference between conic and Kochanek splines.
The two curve types offer a trade-off: better control at the cue points (Kochanek splines) or between them (conic splines). Kochanek spline curves have the additional property of "continuity," described below.
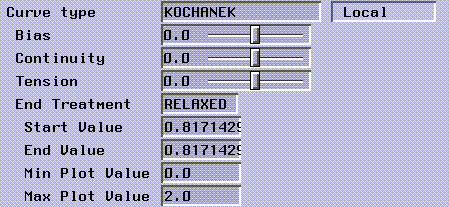
Figure 4.17 Kochanek spline curve parameters
A sample Kochanek spline curve (one with two cues, but default bias, tension, and continuity), looks like this:

Figure 4.18 A sample kochanek spline curve
The cues on a Kochanek spline curve can be manipulated directly in the curve editor. Each cue has a pair of handles associated with it; you can set the bias, tension, and continuity for each cue by dragging the red handle on either side of the cue itself.

Figure 4.19 A sample kochanek spline curve; bias and continuity have been modified on both cues
Sketched Curves
Sketched curves are drawn by hand or generated using one of a set of pre-defined operations; sketched curves can be of any shape.
Sketched curves have the following parameters:
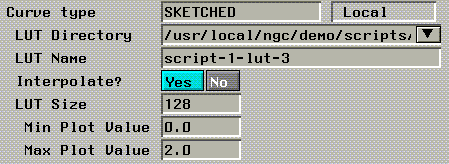
Figure 4.20 Sketched curve parameters
A sample sketched curve looks like this:

Figure 4.21 A sample sketched curve
If you smooth the curve several times, its jagged edges are reduced and transitions over the course of the channel are smoother:

Figure 4.22 The same sketched curve, smoothed several times
Filtered Curves
The shape of filtered curves is set by modifying cue values or by adjusting the filter width. Like conic splines, filtered curves do not pass through cues that determine their shape, they merely approximate their position.
When you set a cue value, you are specifying the point on the vertical axis where you want the object's motion to take it at that time. When you adjust the filter width, you specify the degree of smoothing that occurs over the curve. The filter width is expressed as a percentage of the parent sequence width and is shown as both the percentage and the time that it represents.
In filtered curves, the smoothing is over a specific duration of time (hence a specific width on the diagram regardless of sequence length). A filter width of 0% gives linear ramps between cues. As the filter width increases, the curve becomes smoother.
While the cues of the curve specify the same values at the same place for both the 25% and 100% filter widths, the curves will be quite different-the 25% filter produces a longer straight section between shorter curves, while the 100% filter width produces continual curves with no noticeable linear sections.
As filter width increases, so does deviation from the cue value. A filter width of zero gives a curve that consists of a series of linear ramps between cues, while a filter width of 100% gives a smooth curve that deviates strongly from the exact cue values.

Figure 4.23 Filtered curve parameters
Figure 4.24 A sample filtered curve, with a filter width of .25
Reducing the value of the filter width produces a more linear appearance at each defined cue, since less of the curve is "smoothed:"

Figure 4.25 The same filtered curve, with a filter width of .1
Slow In Curves
A Slow In curve is exponential; you define the shape of the curve (how slow the "in" effect of the curve is) by changing the exponent value for the curve.
The default exponent is 2.5. Adjusting this value determines just how slow the Slow-In is. An exponent of 1 gives a linear ramp. Larger values correspond to proportionately higher rates of acceleration.

Figure 4.26 Slow In curve parameters
Figure 4.27 A sample Slow In curve
Slow Out Curves
A Slow Out curve (like the Slow In), is an exponential curve; you define the shape of the curve (how slow the "out" effect of the curve is) by changing the exponent value for the curve.
The default exponent is 2.5. Adjusting this value determines just how slow the Slow-Out is. An exponent of 1 gives a linear ramp. Larger values correspond to proportionately higher rates of acceleration.

Figure 4.28 Slow Out curve parameters
Figure 4.29 A sample Slow Out curve
Spherical Linear Curves
Spherical linear curves use quaternion notation (four values) to record each cue value. This curve type is most often used with certain operations in the Skeletal Animation System to avoid gimbal lock.

Figure 4.30 Spherical Linear curve parameters
Parameters for this curve are identical to those for the Linear curve type, described in the section "Linear Curves," on page 4-6.
The Curve Editor
If you want to edit a curve directly, you need to use the Curve Editor. In the Curve Editor, you can slide cues, change the value of cues, and for certain types of curves, change the bias, tension, and continuity of cues.
Before using the curve editor, you should select the basic curve type for the channel using the Edit Curve Properties dialog box described in the section "Curve Types," on page 4-6.
Next, enter the basic parameters for the selected curve type, as described in the section "Curve Types," on page 4-6.
Once you've done the basic setup for the curve channel, you're ready to use the Curve Editor. To open the curve editor:
1. (CLICK-M) on the curve.
2. (CLICK-L) on the Edit Curve button at the bottom of the Edit Curve Properties dialog box.
- The channel containing the curve expands to fill the entire window; the type of data shown in the channel depends on the curve type selected. Suppose you had created a linear curve in a 30 frame channel with cues at frames 10 and 20. The curve might look something like this in the Script Editor:

Figure 4.31 A simple conic spline curve with two cues
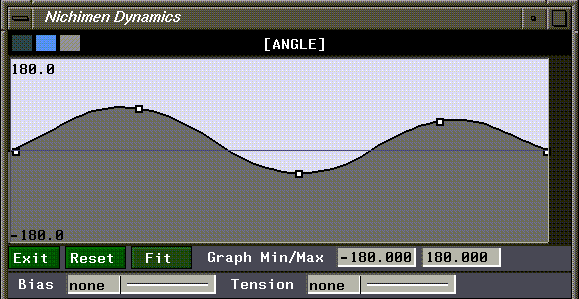
If you were to view the same curve in the Curve Editor, it would look something like this:
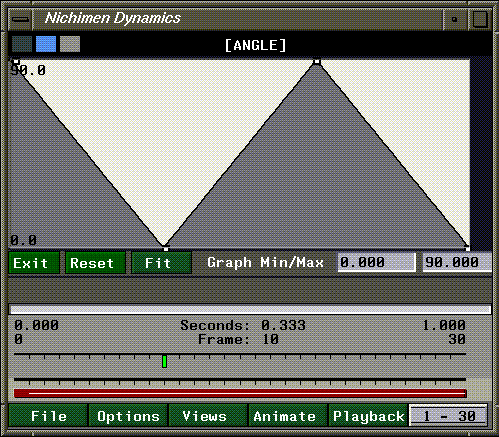
Figure 4.32 A simple linear curve with two cues
Note that the cues are represented by points along the curve in the Curve Editor. This lets you move the cues either left or right (to change their position in time) or up and down (to change their value).
The various commands in the Curve Editor are described below:
Exit
Exit from the curve editor after you have made any changes to the curve.
Reset
Resets the curve to its shape when first opened in the Curve Editor, regardless of the number of changes you have made to it.
If you want to escape from the Curve Editor without saving your changes, choose Reset, then Exit.
Fit
Fit and Graph Min/Max are used in conjunction with one another to adjust the scale of the curve. If, for example, you want to use values between 1 and 50 in this curve:
1. Enter those values as your minimum and maximum in the Graph Min/Max text edit boxes.
2. (CLICK-L) or (CLICK-M) on Fit.
- The display is adjusted so that the highest and lowest points in the curve are visible in the channel. ((CLICK-M) adds a little padding above and below the highest and lowest points.)
Graph Min/Max
Specifies the lowest and highest values displayed in the curve channel. Changing these values does not affect the values of any samples in the curve; only the portion displayed in the curve editor.
Shifting or Scaling the Entire Curve
In the curve editor, the following commands can be used to shift a curve in time or value, or to scale it in value:
Working with Cues in Curve Channels
As mentioned at the beginning of this chapter, a cue is a marker in a curve channel with a specific value. The shape of the curve is bound by the value in those cues and the curve type.
Cues in the curve channels can be modified as follows:
Adding a Cue
To add a cue:
1. Move the mouse over the curve channel.
2. (CLICK-R) on the channel at the point you want to add the cue.
3. (CLICK-L) on Add Cue.
- Note. You can also use the hot key "s" to add a cue.
Moving a Cue
Moving a cue left or right changes its position in time; moving it up or down changes its value.
To move a cue:
1. Move the mouse over the cue.
2. (DRAG-L) to move the cue left and right in time.
- If you are in the curve editor, you can also move the cue up or down (changing its value)-the new value is displayed in the label at the top of the curve editor.
Editing a Cue's Value
To edit the value of a cue, (CLICK-M) directly on the cue; the type of dialog box that appears depends on whether the cue contains a simple value (like a number) or a complex value (like a pose or camera position).
Cue Type #1: The Cue contains a Simple Value
Cues that specify a simple value like degrees of rotation, or a scaling factor can be modified as follows:
1. (CLICK-M) on the cue.
- The following dialog box appears:
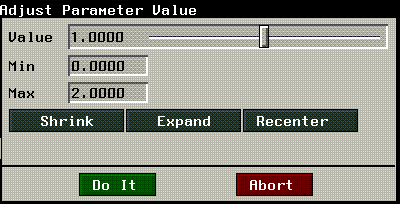
Figure 4.33 Using the slider to edit values
Each of the elements on the Adjust Parameter Value dialog box are described below:
Cue Type #2: The Cue contains a Complex Value
Cues that specify a complex value such as a displacement, skeleton pose, or camera view, are modified as follows:
1. (CLICK-M) on the cue.
- A dialog box or list prompting you to select a displacement, pose, or view from a known list of such variables is displayed:

Figure 4.34 Using the slider to edit values
- Note that you also have the choice of copying the current state of the camera, skeleton, or model into the cue, so that you can interactively set up your animation.
Editing Concurrent Cues
Cues that occur at the same time are said to be concurrent.
The method described above is useful if you want to edit a single cue. If you want to edit several cues that occur at the same time in the script, you can use the following method:
1. Open the parent channel that contains the curves whose cues you want to modify.
2. (SHIFT-M) on the one of the concurrent cue you want to modify.
- You can (SHIFT-M) on either a cue or, if you have a marker track, on the marker with which the cue is associated. When you (SHIFT-M) on the cue, it and any other cues at that position are temporarily highlighted in red. (This is a toggle-use (SHIFT-M) again to deselect the marker.)
- For example, if you were working with the curves in an XYZ Rotate cube action, (SHIFT-M) on the marker would highlight any other cues at that position:
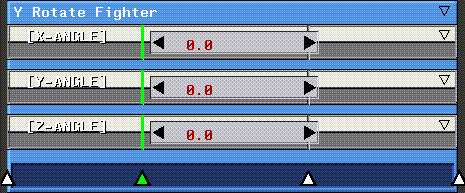
Figure 4.35 (SHIFT-M) on a cue to highlight all cues at that position and bring up sliders to modify those cues
Sliders appear in each channel with a selected cue. There are two ways to update the value of the selected cue; both methods display the updated object in the N-Geometry window:
Cues are selected based on their position in time, not whether they are linked; this means cues in other open curve channels that exist at the same time as the selected marker can be highlighted (and can be updated) as well.
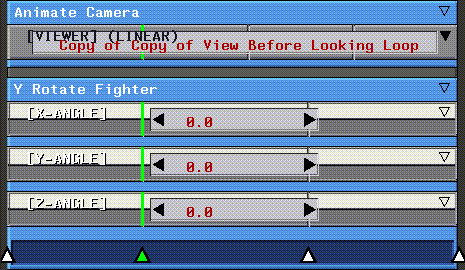
Figure 4.36 (SHIFT-M) edits cues at the same time, regardless of whether they're linked or not. Note that the first channel contains a view, while the others contain values; you can edit all at the same time using this technique.
Deleting a Cue
To delete a cue from a curve channel:
1. Move the mouse over the cue you want to delete.
2. (SHIFT-R) on the cue.
3. (CLICK-L) on Delete.
- Note. You can also use the "Shift-D" hot key to add a cue.
Editing Sketched Curves
Editing sketched curves is slightly different than editing the other curve types supported by N-Dynamics. When you load a sketched curve into the Curve Editor, only the data contained in the curve itself and a menu bar are displayed:
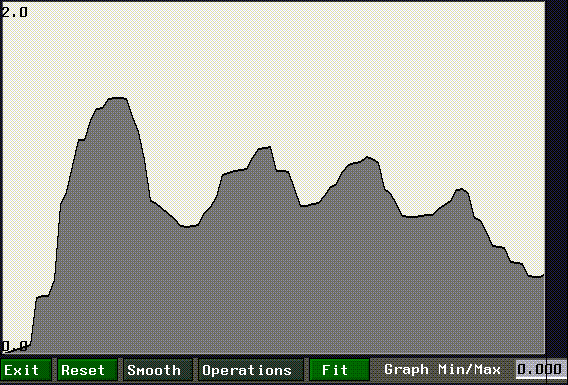
Figure 4.37 Editing a sketched curve
To edit the shape of a curve manually:
1. Move the mouse over the curve channel.
2. (CLICK-L) and drag to change the shape of the curve.
- As you draw, a series of black dots show the new shape of the curve; when you let up on the mouse button, the shape of the curve is updated.
The rest of the menu buttons along the bottom of the curve channel are described below:
Exit
Exits from the Curve Editor.
Reset
Resets the curve to its state when you entered the Curve Editor.
Smooth
Smoothes the drawn curve (reducing jaggies and making motion smoother). When you smooth a curve, the following dialog box appears:

Figure 4.38 Smooth options
You can repeatedly smooth the curve by holding down the appropriate mouse button:
Operations
The operations button lets you perform operations that affect the overall shape of the sketched curve:
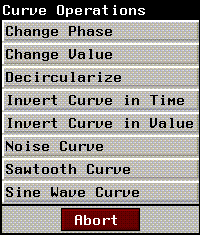
Figure 4.39 Sketched curve operations
Each of these operations is described below:
Change Phase
Shifts the entire curve either right or left in time:
A value of 1 returns the curve to its original position.
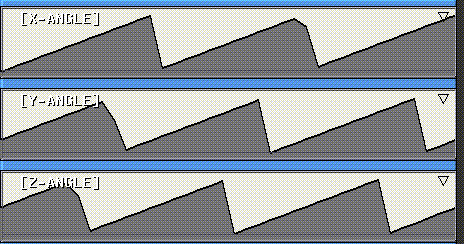
Figure 4.40 Top, original curve; middle, same curve with phase change of .75; bottom, with phase change of .5
Change Value
Shifts the entire curve up or down by adding or subtracting the specified amount from the entire curve:
If you add or subtract too much to the curve, you may want to use the Reset command to return the curve to its original state, or expand the displayable range of value using the Graph Min/Max boxes (described below).
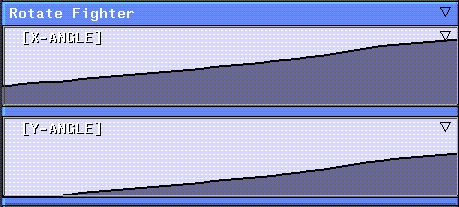
Figure 4.41 Top, original curve; bottom, same curve with reduced value
Decircularize
In some curves, particularly those dealing with rotations, data can be cyclical; for example, a cube rotated 180 degrees looks the same as a cube rotated 540 degrees. In skeletal motion capture files, for example, it's not unusual for a skeleton to think that a bone has rotated 1 1/2 times rather than 1/2 a time; interpolating the position of a skeleton using the data will cause a "jump" when that point in the curve is encountered.
Look at the following curve:

Figure 4.42 Curve showing jump in data
The data starts in a fairly straight line, then makes a large jump and continues along in a straight line.
To decircularize the data in the curve:
1. (CLICK-M) on the curve in the script editor.
2. (CLICK-L) on Edit Curve.
3. (CLICK-L) on the Operations button in the curve editor.
4. (CLICK-L) on Decircularize.
- The following dialog box is displayed:
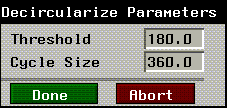
Figure 4.43 Decircularize curve parameters
When the curve decircularized, it is automatically made to fit the channel, so the variations along the surface of the curve are more pronounced. If you set the Graph Min/Max range to match the original curve, you can see the effect more clearly:
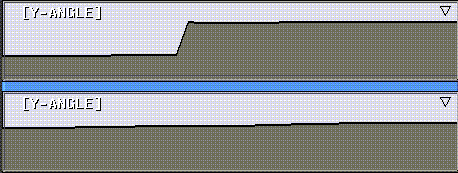
Figure 4.44 Top, original curve; bottom, same curve after decircularize operation
Invert Curve in Time
Flips the curve left to right.
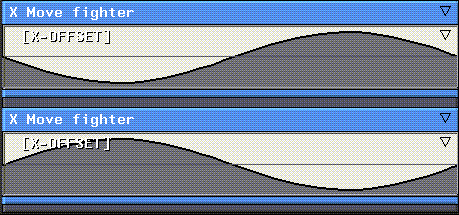
Figure 4.45 Top, original curve; bottom, same curve inverted in time (flipped left to right)
Invert Curve in Value
Flips the curve upside down.
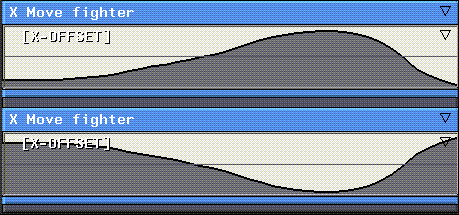
Figure 4.46 Top, original curve; bottom, same curve with inverted value (flipped up/down)
Noise Curve
Adds random noise to the curve. Adding noise help eliminate some of the "artificial" feel of some computer animation by adding various levels of randomness to the controlled behavior.
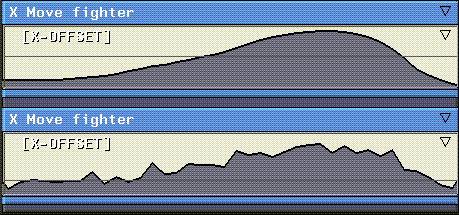
The current minimum and maximum values are displayed in the upper and lower left corner of the curve channel respectively. When you add noise you can specify the following parameters:
Figure 4.47 Top, original curve; bottom, same curve with noise added
Sawtooth Curve
Sawtooth curves are a simple way to create cyclical motion (such as repeated rotations) over the length of a channel.
A sawtooth curve looks something like this:
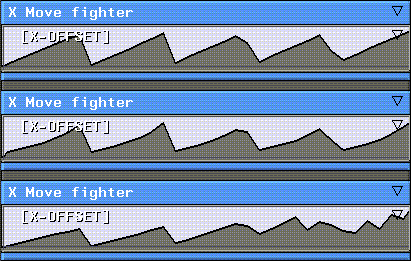
Figure 4.48 Top, sawtooth curve with five cycles; middle, same curve with modified value exponent; bottom, with modified time exponent
The effect is most obvious if you use the Set combination (described below), which will create regular "teeth" on the new curve. Making an existing curve into a sawtooth curve creates the sawtooth effect along the existing shape of the curve.
Sine Wave Curve
Creates a series of sine waves over the length of the curve. This is useful for repetitive "in/out" or "side to side" motion.
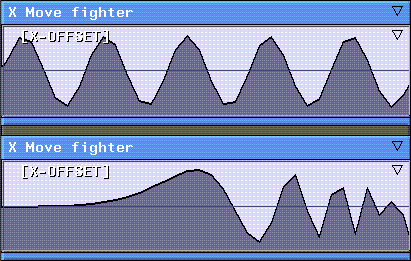
Figure 4.49 Top, sine wave curve with five cycles; bottom, with modified time exponent
For a description of the various sine wave parameters, see the description of the sawtooth curve above.
Curve Operations Menu
The curve operations menu performs a number of curve related operations; moving and resizing curves, working with cues inside the curve, and other various options.
(CLICK-R) on a curve channel to see the curve operations menu:
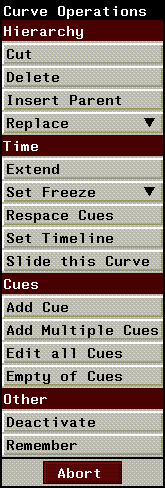
Figure 4.50 The curve operations menu
Each of these commands is described in the sections below.
Cut
Cuts the curve in half, creating two sequential curves.

Figure 4.51 Cutting a curve
The cue at which the two sequential curves meet shares a single value with both:

Figure 4.52 Sequential curves share a cue
Delete
Deletes the curve channel from the script. Note that an operation that normally expects to find a curve channel for the script use whatever local value is available to execute the operation.
Insert Parent
Inserts a parent channel around the selected curve channel. The inserted channel is given the same operation type as the current parent channel. For example, in Figure 4.53, if the channel zzz is a Z Rotate operation, the inserted parent is also a Z Rotate operation:
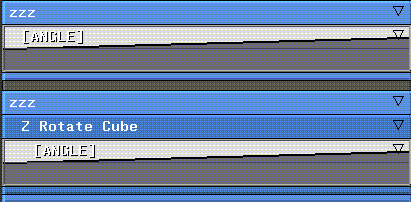
Figure 4.53 Top, channel with curve; bottom, parent inserted around curve
Replace with Action
Replaces the selected channel with an action. The action assigned an operation type of None.
To replace a curve with an action:
1. (CLICK-R) on the curve you want to replace.
2. (CLICK-L) on Replace with Action.
- The curve is converted into an action:
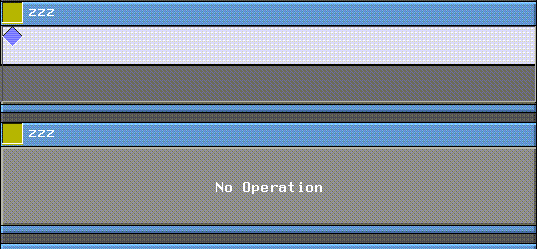
Figure 4.54 Top, channel with curve; bottom, curve replaced by operation
Replace with Copy
Replaces the selected curve with the last channel remembered with the Remember command.
Replace with Variable
A curve channel may take its value at any point, by evaluating a variable that has been defined in another channel. If you want to use a variable in one channel that has been created in another:
This command is described in more detail in the section "Replace with Variable," on page 3-44.
Replace with Sequential Curves
Inserts a parent channel (named Sequential Curves) around the selected curve channel (of type Return Value). Sequential curves must be contained in a parent channel.
This command is described in more detail in the section "Replace with Sequential Curves," on page 3-46.
Extend
This is identical to the operation for actions described in "Extend Curves," on page 3-55.
Freeze Cues/Unfreeze Cues
Freeze or unfreeze all cues contained in the current channel.
Frozen cues are described in more detail in the section "Freeze/Unfreeze," on page 3-27.
Respace Cues
Redistributes the curves in a channel evenly over the length of the channel. To respace the cues in a curve channel:
1. Move the cursor over the curve.
2. (CLICK-R) on the curve.
3. (CLICK-L) on Respace Cues Evenly.
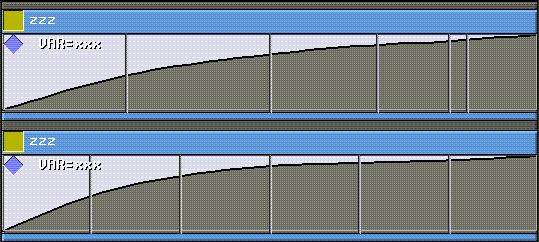
Figure 4.55 Top, curve with random cue positions; bottom, cues respaced evenly
Set Timeline
This is identical to the operation for actions described in "Set Timeline," on page 3-57.
Slide this Curve
This is identical to the operation for actions described in "Slide," on page 3-55.
Add Cue
Adds a new cue to a curve channel. To add a new cue:
1. (CLICK-R) on the curve channel where you want to insert the cue.
2. Choose the Add New Cue command.
- Note. You can also add cues to the curve using the "s" hot key.
Add Multiple Cues
Adds the specified number of cues to the channel, spacing them evenly over the length of the channel.
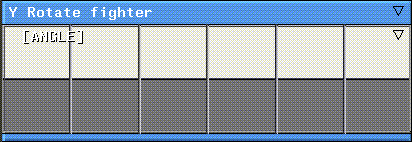
Figure 4.56 Curve Channel With Five Cues Added, Using Add Multiple Cues
Edit all Cues
Edit values for all cues in the selected curve channel. The interaction is slightly different depending on whether the channel contains simple values (e.g. rotation angle, scaling factor) or complex values (e.g., camera view, displacement state, or skeleton pose).
Cue Type #1: Cues in the Channel Represent Simple Values
Cues that specify a simple value like degrees of rotation, or a scaling factor can be modified as follows:
1. (CLICK-R) on the curve whose cue values you want to edit.
2. (CLICK-L) on Edit all Cue Values.
- A menu similar to the one in Figure 4.57 appears:
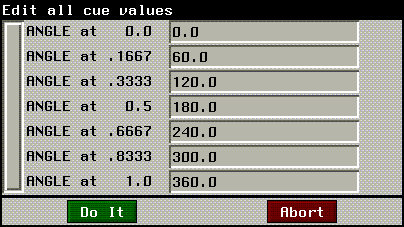
Figure 4.57 You can edit the values for all cues in a given curve channel
3. Modify any or all of the values by clicking in the appropriate text box.
4. (CLICK-L) on Do It when you're finished.
Cue Type #2: Cues in the Channel Represent Complex Values
Cues that represent a complex value such as a camera position, displacement state, or skeletal pose display the same dialog box shown in Figure 4.57; however, any mouse click brings up a list of saved positions, displacement states, or poses that can be inserted at that cue.
Empty of Cues
Removes all cues from the curve (except for the default cues at the beginning and end of the channel).
Deactivate
Temporarily deactivates the curve (in most cases, causing the operation to have no effect).
In the Script Editor, the text label of a deactivated channel is black; the text for active channels is white.
- Note. You can also use the "a" hot key to deactivate the channel currently under the mouse.
Remember
Remembers the selected curve channel, so that it can be copied into another channel in the script with the Replace with Copy command. All cues and their values are copied into the target channel.
[N-World Contents] [Book Contents] [Prev] [Next] [Index]
 Another fine product from Nichimen documentation!
Copyright © 1996, Nichimen Graphics Corporation. All rights
reserved.






 Another fine product from Nichimen documentation!