[N-World Contents] [Book Contents] [Prev] [Next] [Index]

The Interface


This chapter describes the basics of the N-Dynamics interface. It describes the basic components of the Script Editor, basic script management tasks, animating scripts, making and saving recordings, and more.


The Script Editor

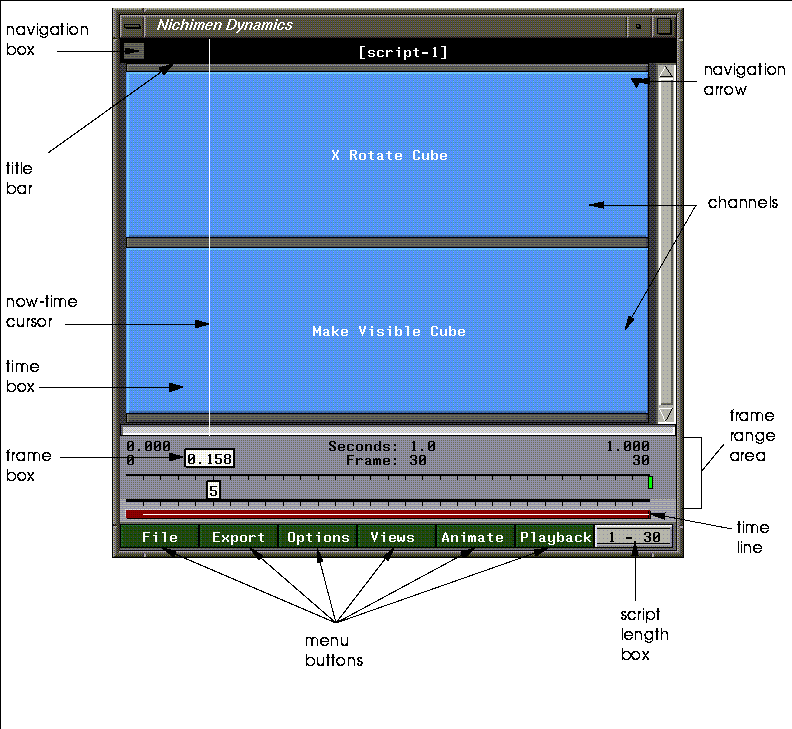
The work area of N-Dynamics is the script editor, shown in Figure 2.1. You create, edit, and modify scripts in the script editor:

Figure 2.1 The N-Dynamics Interface

The N-Dynamics window can be resized both vertically and horizontally to view either more channels or a larger part of a given channel. The following paragraphs briefly describe the major parts of the script editor.

Navigation Box

The navigation box shows your relative depth in the current script.

Title Bar

Displays the name of the current script. You can (CLICK-R) on the title bar to perform various script level operations, described later.

Channels

When you first create a script, the script editor pane displays an empty gray window to represent the script. To build a script, you fill it with channels.

Channels and their subchannels are displayed as nested blocks.

Now-Time Cursor

The vertical line running up and down the script is called the now-time cursor. As you move the mouse left and right over a script, both the time box and the frame box update interactively.

Time runs from left to right.

Note. You must have a script loaded for the time box and frame box to update interactively; if you have no script, there is no point of reference for the now time cursor.

Frame Range Area

The frame range area contains both the time box and the frame box (described below). It shows the length of the script and shows your current position within the script.

Time Box

The time box shows the time (in seconds) that corresponds to the position of the now-time cursor. The two small numbers in the upper-left and upper-right corners (0.000 and 1.000 in Figure 2.1) show the start and end times for the script.

Frame Box

The frame box shows the frame number that corresponds to the position of the now-time cursor.

Frame Range Box

The frame range box (next to the Playback button) shows the frame range that is currently "selected." These are the frames that will be animated or played back with the Animate or Playback buttons (described below).

Time Line

The time line lets you control the portion of the script currently in view in the
N-Dynamics frame. (The time line regulates which portion of a script is animated when it is executed.) The time line is discussed in more detail in
Chapter , "Using the Script Editor."

Navigation Arrow

If a navigation arrow appears in a channel, it indicates that the channel contains one or more subchannels. N-Dynamics has a hierarchical structure, so it is possible to place channels within other channels.

For operations that are dynamic (e.g., that change over time), you define that change in a curve subchannel. Both curves and other operations can be contained in a top-level or parent channel.

Script Length Box

The script length box indicates the current length of the script. You can also (CLICK-L) on the button and modify the length of the script, specifying either a target number of frames or a script length (in seconds).

Menu Buttons

There are five buttons across the bottom of the Script Editor:

Each of these are described in the following sections.


File

You use the File button to create, copy, kill, rename, select, load, and save scripts. A script is a series of instructions that lets you trigger different events in the other N·World products.

You might write a script, for example, that rotated a cube (in N-Geometry), applied a material to the cube and rendered it (in N-Render), then composited the colored cube onto an image (in N-Paint). Most operations in the N·World suite of products can be animated using N-Dynamics-see Chapter 5, "Dynamic Operations" for a complete list.

If you (CLICK-L) on the File button but haven't loaded any scripts, N-Dynamics displays the following menu:

Figure 2.2 Creating or loading a script

Both of these options are described below.

Note! Any changes you make to scripts are saved only in memory until they are explicitly saved using the commands under the File button.

If you have already created or loaded a script into memory, additional options appear when you (CLICK-L) on File:

Figure 2.3 Script operations

Each of the options on the Script Operations menu is described in the following sections.

Creating a New Script

The Create New Script command lets you start a new script in N-Dynamics.

1. (CLICK-L) on File>Create New Script to create a new script.

2. Enter the directory and name you want to use for the new script:

Figure 2.4 Adding a new script

You can create any number of scripts in N-Dynamics.

Note. The script exists only in memory until saved! Save the copy using the commands under the File button.

Making a Copy of a Script

To make a copy of a script in memory (also to memory):

1. Make the script you want to copy the current script.

2. (CLICK-L) on File>Copy this Script.

Enter the new directory and name for the copy:

Figure 2.5 Copying a script

3. (CLICK-L) on Do It.

Note. The copy exists only in memory until saved! Save the copy using the commands under the File button.

Deleting a Script

To delete a script from memory:

1. (CLICK-L) on File>Delete Scripts.

A list of scripts loaded into memory is displayed:

Figure 2.6 Killing a script from memory

2. (CLICK-L) to highlight each script you want to delete.

3. (CLICK-L) on Do It.

Note. This deletes the selected script from memory only! If you want to delete the saved script from disk, you must do so from a UNIX shell. In the UNIX file system, scripts have the extension .script.

Renaming a Script

If you want to change the name of the currently selected script:

1. (CLICK-L) on File>Rename this Script.

Enter the new name and directory for this script.

Figure 2.7 Renaming a script in memory

2. (CLICK-L) on Do It.

Note. This changes the name of the script in memory only! You still must save the script using the commands under the File button to write its new name to file.

Making a Script the Current Script

If you have more than one script loaded into memory and want to select which script to make the current script:
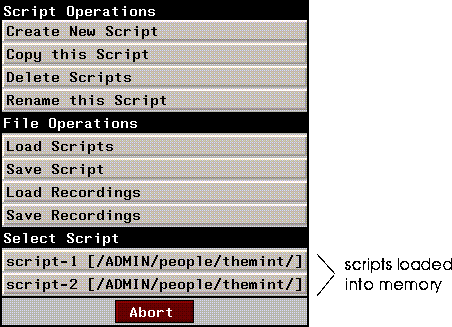
1. (CLICK-L) on File.

Any scripts in memory appear at the bottom of the menu.

2. (CLICK-L) on the script you want to work with.

Figure 2.8 Selecting a script you've already loaded

Loading a Script

Loading a script reads a script from disk; if any elements (such as objects or materials) were referenced by the script, they are also loaded when you read in the script.

To load a script from disk:

1. (CLICK-L) on File>Load Scripts.

A dialog box similar to the one below is shown:

Figure 2.9 Reading a script from disk

Loading a Script from your Default or a Previously Used Directory

At the top of the menu shown in Figure 2.9 is a list of directories from which you have already loaded elements. (By default, only the current user's home directory is displayed here).

To load a script from this directory:

1. (CLICK-L) on the directory.

A list of scripts in that directory is displayed:

Figure 2.10 Reading a script from disk

2. (CLICK-L) on each script you want to load.

As each script is selected, it turns blue. You can load more than one script at a time.

3. (CLICK-L) on Do it.

The selected scripts are loaded into memory.

Loading a Script from a Random Directory

If the directory from which you want to load a script is not shown at the top of the menu described in Figure 2.9, you can specify a random directory from which to load a script.

To specfy a "random" directory:

1. (CLICK-L) on File>Load Scripts>Specify a new Directory.

A dialog box is displayed.

Figure 2.11 Specifying a new directory

2. Enter the name of the directory from which you want to load a script.

3. (CLICK-L) on Done.

A list of scripts in that directory is displayed:

Figure 2.12 Reading a script from disk

4. (CLICK-L) on each script you want to load.

As each script is selected, it turns blue. You can load more than one script at a time.

5. (CLICK-L) on Do it.

The selected scripts are loaded into memory.

Saving a Script

When you save a script, you save your work permanently to disk. When you save a script, you save the following elements:

To save a script and (optionally) any objects associated with that script:

1. (CLICK-L) on File>Save Script.

A dialog box similar to that shown below appears:

Figure 2.13 Writing scripts and objects

You have the option of saving the script, the objects, or both.

Saving objects with scripts is recommended.

Loading Previously Saved Recordings

When you animate a script, a one-bit black-and-white "preview" or recording of the animation is generated. These recordings can be played, saved to disk, and then read back in later.

You might, for example, create several test animations then play them back for comparison. See the section "Animate," on page 2-29 for more information on recordings.

Saving Recordings

To save a recording (black-and-white preview) to disk:

1. Animate the script.

This generates the one-bit playback test animation (the recording). You cannot save a recording until the script has been animated. See the section "Animate," on page 2-29.

2. (CLICK-L) on File>Save Recordings.

A dialog box similar to that shown below appears:

Figure 2.14 Writing recordings

The "Type" column at the far right of the dialog box tells you that the objects being saved are recordings.

A separate entry appears for each recording you have saved to memory (see "Renaming a Recording," on page 2-35 for information on how to save multiple recordings to memory.)

3. (CLICK-L) on Yes for each recording that you want to save.

4. (CLICK-L) on Done.


Project Operations

If you are working on a large project whose files are located in a set group of directories, you can create a project. A project is nothing more than a named set of directories. When you load a project, you load the directories into the menu described in Figure 2.9, making it easy to select them with a single mouse click.

You might, for example, create a project named "space_warrior" that used
N-Geometry objects from one directory and N-Paint images from another. Simply by loading the project "space_warrior" into memory, any associated directories are made added to the menu in
Figure 2.9.

Note. Project definitions are kept in a user's home directory, in a file called /.ngc/.ngc-projects.

To see the project operations menu:

1. (CLICK-L) on Load Scripts.

The following menu is displayed:

Figure 2.15 The Project Operations menu

Setting the Current Project

Selecting the project you want to work with loads all the directories associated with the project into the appropriate directory lists. These directories are displayed at the top of the menu shown in Figure 2.15 and whenever you (CLICK-R) on a field that specifies a directory in N-Dynamics).

To select the project you want to work with:

1. (CLICK-L) on File>Set Current Project.

A list of projects defined for the current user is displayed:

Figure 2.16 Selecting a project

2. (CLICK-L) on the project you want to make the current project.

Edit Current Project

To specify which directories should be included in the current project:

1. (CLICK-L) on File>Edit Current Project.

A list of directories associated with the current project is displayed:

Figure 2.17 Specifying directories for a project

2. (CLICK-L) to highlight each directory you want to make part of the project.

You can select more than one directory at a time. Note that to add a new directory to a project, you must use the Specify a new Directory command.

3. (CLICK-L) on Do it.

The selected scripts are loaded into memory.

Note. The asterisk next to a directory ("*") tells you that the directory is not part of a project. Reading from or writing to a directory does not add it to the list of directories associated with the current project-you must do this explicitly.

Creating a New Project

To create a new project:

1. (CLICK-L) on File>Load Scripts>Create New Project.

The following menu is displayed:

Figure 2.18 Naming a new project

2. Enter the name for the project.

3. (CLICK-L) on Done.

Your project definitions file (/.ngc/.ngc-projects in your home directory) is updated automatically.

4. Add directories to the project.

This procedure is described in the section"Edit Current Project," on page 2-16.

Deleting Project Definitions

If you've finished working with a project, and want to delete it from the list of displayed projects:

1. (CLICK-L) on File>Load Scripts>Delete Project Definitions.

A menu of currently loaded project definitions is displayed:

Figure 2.19 Deleting project definitions

2. (CLICK-L) to highlight each project definition you want to delete.

Note that only the definition, not the actual directories themselves, are deleted in this process. You can select more than one project at a time to delete.

3. (CLICK-L) on Do it.

The selected projects are deleted.

Note. This command deletes project definitions permanently.


Export

The Export button is used in conjunction with Nichimen's Game Express and Game Exchange tools to preview and export animation data created in N·World.

In order to use the Export button, you must have:
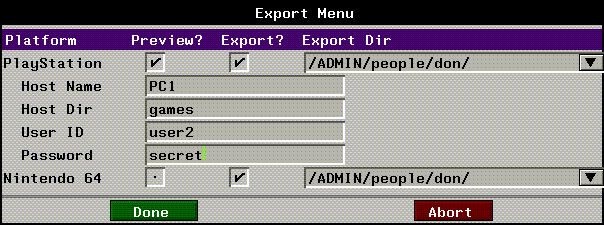
The record animation operation records all the information necessary to export animation data to the various platforms. After animating the script, you'd (CLICK-L) on Export to specify additional Export parameters:

Figure 2.20 Exporting animation data

The platforms to which you can export are displayed on the left side of the dialog box.

For more information on exporting animation, refer to the description of the Record Animation operation later in this manual, and to the appropriate Game Express User's Guide for your target platform.


Options

The Options dialog box lets you control the "look and feel" of N-Dynamics-how channels are displayed (or highlighted), playback rate, channel colors, and so forth.

If you (CLICK-L) on the Options button at the bottom of the N-Dynamics window, the dialog box in Figure 2.21 is displayed:
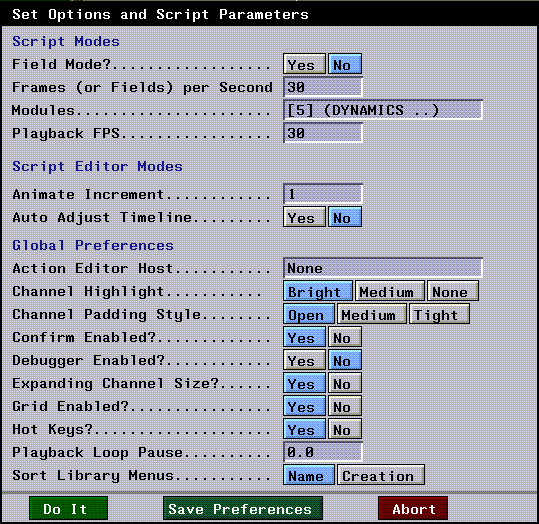
Figure 2.21 The Options dialog box

Script Modes

Note. Modes settings are saved with each script, not as a user default.

Script Editor Modes

Note. Modes settings are saved with each script, not as a user default.

Global Preferences

Note. Global preferences are saved in each user's preference file.


Views

If you want to look at different parts of the same script at the same time (for example, you can split the N-Dynamics window; each smaller window is referred to as a "view.")

When you've reconfigured the window into a set of multiple views that you like, that setup can be saved as a "configuration."

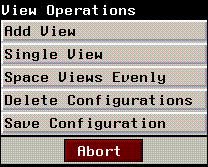
The commands under the Views menu let you add and remove views and configurations. If you (CLICK-L) on Views, the View Operations menu is displayed:

Figure 2.22 The Views operations

Adding a View

There are three ways to create additional views in an N-Dynamics script:

Method #1

To add a second view of the current script:

1. Make sure you have a script loaded.

The example below is from the script triple-rotate, which is in the directory /usr/local/ngc/demo.

2. (CLICK-L) on Views.

3. (CLICK-L) on Add View.

A white bar appears across the center of the N-Dynamics window, splitting the window into two views of the same script:

Figure 2.23 Left, single view of script; right, two views of same script

Each view has a black title bar across the top, which shows the name of the script in square brackets. With multiple views of the same script, you can view different channels in the same script at the same time.

4. In the top view, (CLICK-L) on the channel X Rotate Cube.

The channel expands to fill the entire top view.

5. In the bottom view, (CLICK-L) on the channel Z Rotate Cube.

Figure 2.24 Left, split view of script "triple-rotate"; right, top and bottom of channels exploded to fit entire view

As Figure 2.24 shows, multiple views let you view curves for channels which are not next to each other in the script. Note that you can continue to add as many views as you want, so that you have two, three, or as many views as you need.

Note. You can also leave the top view as a kind of reference "view" and zoom in on other channels in other views.

Method #2

To add a second view and fill it with a selected channel:

1. (CTRL-L) on the channel you want to get a "close-up" view of.

A second view opens; the selected channel is displayed so that it fills the entire created view:

Figure 2.25 Left, split view of script "triple-rotate"; right, after (CTRL-L) on a selected channel, which creates a second view for just that channel

Method #3

To add a second view by dragging the mouse:

1. (DRAG-L) on the white bar at the bottom of the script editor window.

The white bar runs from side to side, just above the Seconds label.

You can resize any view by dragging the white bar at the bottom of the view up or down.

Single View

Closes all views but the top level view in the N-Dynamics window:

Figure 2.26 Reducing to a single view of a script

Spacing Views Evenly

If you've already created several views, and want to make them all take up the same amount of space vertically in the N-Dynamics window:

1. (CLICK-L) on Views.

2. (CLICK-L) on Space Views Evenly.

Each view resizes vertically to take up the same amount of space in the
N-Dynamics window:

Figure 2.27 Space views evenly makes all views the same size

Saving View Configurations

Once you've created several views of a script, you can save them together as a view configuration. The view configuration remembers the size of each view, and the state of each channel in each view.

Note. Configurations are saved only to memory, not to disk. If you kill a script from memory, the views associated with that script are flushed.

For example, if you had two views open, with all the channels in the top view closed but only a single channel in the bottom view open, you could save that setup as a configuration:

1. (CLICK-L) on Views.

2. (CLICK-L) on Save Configuration.

Enter the name for the new view configuration in the dialog box that appears:

Figure 2.28 Saving a configuration to memory

Saved view configurations appear at the bottom of the View Operations menu:
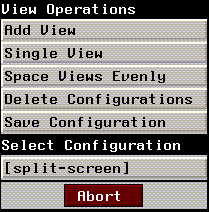
Figure 2.29 Selecting a saved view configuration

To select a previously saved view configuration:

1. (CLICK-L) on Views.

2. (CLICK-L) on one of the view configurations under the Select Configuration section.

Deleting View Configurations

If you want to delete a view configuration:

1. (CLICK-L) on Views>Delete Configurations.

A list of saved view configurations is displayed:

Figure 2.30 Deleting a view configuration from memory

2. (CLICK-L) to highlight each of the configurations you want to delete.

3. (CLICK-L) on Do it.


Animate

After you've created a script, the Animate button lets you execute it. At each frame, every channel is executed, from top to bottom. When all channels have been executed for the first frame, all channels that affect the second frame are executed, again from top to bottom, and so on until the end of the script is reached.

Note. The order in which channels appear in a script can drastically affect an animation. For example, you typically place any Render channel near the bottom of the script, after you've executed any other operations on your objects.

As the script animates, you can watch its progress in the N-Geometry window. The black-and-white animation that you see playing back in the N-Geometry window is called a recording. You can save multiple recordings to memory, then play back different versions for quick comparisons. You can animate a script with or without a recording:

If you have included an operation in your script that writes frames out to disk (such as a Save Image to File operation), the Animate command also writes out those frames.

Note. Only the frames in the frame range box (in the lower right corner of the script editor) at the time you click on Animate are animated.

Animating Scripts with Paint, Render, or Shading Operations

There are several cases where you should use (CLICK-M) to animate:

If you want to generate test recordings for scripts that contain these operations, you can write those frames to a movie. See the section "Record Movie Image," on page 5-22, for more information; saving a movie file is also described in the N-Dynamics Tutorial.

Animating Part of a Script

If you don't want to animate an entire script, you can use the mouse to select an individual frame, or range of frames that you want to animate in the N-Geometry window.

Animating an Individual Frame

To animate an individual frame:

1. Move the mouse over the frame range area until the single frame you want to animate appears in the frame box.

2. (CLICK-L) on the frame range area of the script.

The one-bit preview animation for that frame is displayed in the N-Geometry window.

Animating Interactively

To interactively animate a portion of the script (causing all animation and deformations to be performed interactively):

1. (CLICK-M) and drag the mouse across the frame range area.

The N-Geometry window is updated automatically as you move from frame to frame.

Note. Interactive display to the render display window is not possible. If you want to interactively view part of a script that contains a Render channel, simply deactivate the render channel temporarily.

Animating a Range of Frames

To animate a range of frames (say frames 50-100 of a 300 frame script):

1. (CLICK-L) on the Frame Range Box.

2. (CLICK-L) on Change Active Frames.

Enter the first frame you want to animate in Min Frame and the last frame in Max Frame.

3. (CLICK-L) on Do It.

Note that the white animation line underneath the time line changes length. The white line indicates which frames are active.

4. (CLICK-L) on the Animate button.


Playback

Lets you play back a recording that you have made by executing a script. As described in the section "Animate," on page 2-29, you can save more than one recording for the same script.

You use the commands under the Playback button to select a recording to play, delete recordings, rename recordings, or save a recording by name to memory.

Note. Only the frames in the frame range box (in the lower right corner of the script editor) at the time you click on Playback are played back.

If you want to play back a different recording already loaded into memory:
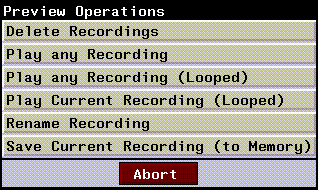
To select a recording-related operation from a menu, (CLICK-R) on the Playback button. The following menu is displayed:

Figure 2.31 Working with recordings

Deleting a Recording

If you've generated several recordings, and want to delete one or more of them to clean up your work area:

1. (CLICK-R) on the Playback button.

2. (CLICK-L) on Delete Recordings.

A list of the recordings currently in memory is displayed:

Figure 2.32 Deleting recordings

3. (CLICK-L) on each recording you want to delete.

Each recording you select turns blue.

4. (CLICK-L) on Do it.

The selected recordings are killed from memory.

Note. This deletes the selected recording from memory only! If you want to delete the saved recording from disk, you must do so from a UNIX shell.

Playing a Recording

To play back a recording that has previously been saved (or loaded into) memory:

1. (CLICK-R) on the Playback button.

2. (CLICK-L) on Play any Recording.

A list of recordings currently in memory is displayed:

Figure 2.33 Playing recordings

3. (CLICK-L) on the recording you want to play back.

The animation is played back one time in the Playback window.

Playing Part of the Last Animated Recording

If you've already executed the script, and want only to reanimate part of the last generated recording:

1. (CLICK-R) and drag the mouse across the frame range area.

The selected portion of the animation plays back in the window.

This option is useful if you are working with a very complex scene that might take too long to animate at real time by using (DRAG-M) with the mouse.

Identifying the Last Animated & Last Played Recordings

If you have saved several recordings to memory, played them back, reanimated, then played others back, you might lose track of which recording is which.

When you play back or rename a recording, a menu like the following is displayed:
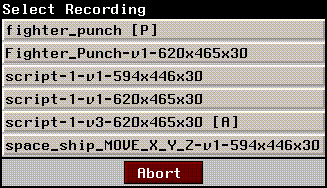
Figure 2.34 Identifying the last played and current recordings

Playing a Recording in Looped Mode

If you want to play a recording in memory other than the current recording in looped mode:

1. (CLICK-R) on Playback.

2. (CLICK-L) on Play any Recording (Looped).

3. Select the recording you want to play back from the menu displayed (which is similar to the one displayed in Figure 2.33).

The animation is played back continuously in the Playback window until interrupted with a click of the mouse.

Playing the Current Recording in Looped Mode

If you want to play the current recording in looped mode:

1. (CLICK-R) on Playback.

2. (CLICK-L) on Play Current Recording (Looped).

The animation is played back continuously in the Playback window until interrupted with a click of the mouse.

Renaming a Recording

To rename a recording that is currently loaded into memory:

1. (CLICK-R) on Playback.

2. (CLICK-L) on Rename Recording.

A menu of recordings currently in memory (like the one in Figure 2.33) is displayed.

3. (CLICK-L) on the recording you want to rename.

Enter the new name for the recording in the dialog box that appears.

Saving the Current Recording to Memory

You can save several recordings to memory so that you can play them back one after another for a quick comparison. You might load a script, animate it, and save that recording to memory; then load a second script, animate it, and save that recording to memory.

You could then use the various Playback commands to play back the recordings one after another.

To save a recording to memory:

1. (CLICK-R) on Playback.

2. (CLICK-L) on Save Current Recording (to Memory).

3. Give the recording a name in the dialog box that appears.

You're also prompted to specify a default directory for the recording, which is the default supplied if you later save this recording to disk.

Note. This saves the selected recording to memory only! If you want to save a recording to disk, use the File/Write Recordings operation, described in "Saving Recordings," on page 2-14.


[N-World Contents] [Book Contents] [Prev] [Next] [Index]

Another fine product from Nichimen documentation!

Copyright © 1996, Nichimen Graphics Corporation. All rights reserved.