 SOFTIMAGE 3D uses five types of curves:
|
This section shows the different configurations of geometry in SOFTIMAGE 3D.
These tools for building and manipulating your objects are very important in understanding the fundamentals of SOFTIMAGE 3D.
Each object type has its own characteristics that make it suitable for different uses.
Combinations of these object types can give you unlimited modelling capabilities.
|
Curves are defined by a set of control points.
More precisely, they are a collection of curve segments attached by their ends, or knots, to make a single curved line.
SOFTIMAGE 3D uses five types of curves:
Linear
Bezier
Cardinal
B-Spline
NURBS
Curves can be open, when the starting and ending points are at different locations (an arc), or closed when the starting and ending points are at the same location (a circle).
Since curves are not 3D models or 2D faces, they are not visible in the final rendering of the image. They can be seen in Shade view when orbiting, zooming or dollying, depending on the current Shade View Setup.
|
The control points may lie on or off the curve. Linear, Bezier, and Cardinal curves pass directly through the control points, whereas B-Splines and NURBS curves of anything other than linear degree usually do not.
By moving or editing the control points you change the shape of the curve.
Depending on the curve type, the control points are interpolated differently to create the curve.
B-Splines and Cardinal curves do not have true end point interpolation. In SOFTIMAGE 3D, this is achieved through the use of phantom control points which are automatically added before the first and after the last control point.
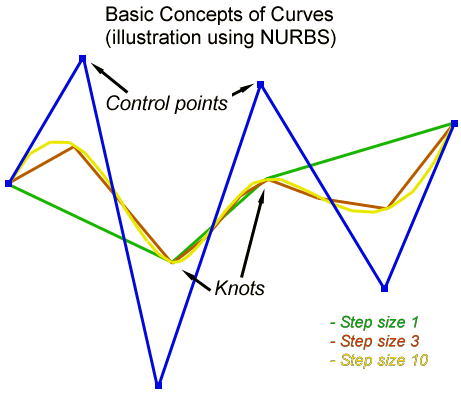 Knots
KnotsKnots are points on the curve or surface where segments join. Unlike control points, knots cannot be seen or directly manipulated and are defined here only for purposes of understanding the behaviour of curves.
In general, the distance between knots is approximated to the distance between the control points.
Between knots, the curve is drawn with small straight lines called steps. The higher the step value, the smoother the curve/surface.
The number of steps defines the resolution of curves and surfaces, both for viewing and rendering. However, it has no influence on the smoothness of movements when a curve is used as a path, or on the smoothness of extruded or revolved objects.
When drawing a curve, the default step is 10, however, this number can be modified at any time using the dialogue boxes called by the Info->Selection command.
|
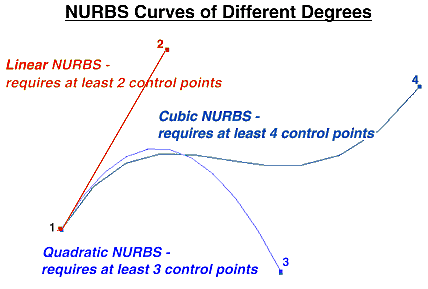
NURBS stands for "Non-Uniform Rational B-Splines". NURBS have the greatest amount of capabilities of all curves. Because of this, they can be described as the general category of all curves. Linear, Bezier, Cardinal, and B-Splines curves are only subsets of NURBS.
Almost everything you can do to other types of curves and surfaces, you can do with NURBS.
You can duplicate them, perform most modelling operations such as extrusion, revolution, skinning, merging, cut, close, subdivide, and so on.
 NURBS have several unique characteristics, which allow greater control than
other curve types:
NURBS have several unique characteristics, which allow greater control than
other curve types:
Each control point can be weighted.
You have a choice of several parameterizations for the curve.
You can control the precision of curve fitting; for example, when
drawing free form curves).
|
Each control point of a NURBS curve has four parameters: x, y, z values, and a fourth parameter w (weight). Weight refers to the relative influence of each control point on the curve segments in its proximity. Weight is always greater than 0: the greater the weight of the control point, the closer the surface or curve moves towards it. A weight of less than 1.0 will actually push the curve or surface away from the control point. For example, you can adjust this value for a control point to make a nose pointier.
As already mentioned, knots lie on the curve and are not visible. The distance between where the knots lie on the curve is approximated by the distance between control points.
When you move or edit the control points, in addition to editing the shape of the curve, you also modify the distance between the knots on the curve.
Linear, Bezier, Cardinal, and B-Splines all have uniform parameterization, in which the delta (difference) between successive knots is expressed in equal increments of 1 without regard to the actual distance between knots.
By contrast, NURBS are non-uniform because the delta (difference) between successive knots does not need to be expressed in uniform increments of 1. It is this non-uniformity which distinguishes NURBS from other curve types and gives them a unique flexibility and localized control.
In theory, non-uniform parameterization simply means "anything goes" so any spacing is possible. The textbooks describe several different types of non-uniform parameterization, each of which attempts to define some relationship between the geometry of the curve and how you are travelling along it.
In SOFTIMAGE 3D, there are four knot parameterizations of NURBS: Non-Uniform, Chord Length, Centripetal and Uniform.
You can edit and subdivide NURBS curve segments without changing the shape of the whole curve. This provides more local control of curve shape, and is the major difference between curves of non-uniform parameterization (NURBS) and curves with only uniform parameterization (Linear, Bezier, Cardinal and B-Spline).
|
The following compares the effects of non-uniform parameterizations (chord length and centripetal) with uniform parameterization.
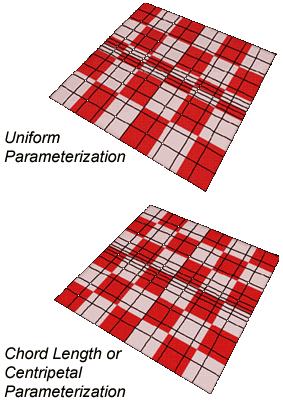 Texture
Mapping
Texture
Mapping Suppose that an object's surface has uniform parameterization, but that the control points are unequally spaced such that the curve segments are unequal in length.
When you apply a texture map, the texture is mapped equally to surface segments which are actually unequal in size. The result is that the texture on the larger segments appears stretched. Each surface segment is treated equally and given an equal "piece" of texture, but the piece of texture has to fit over a surface segment which is larger.
By contrast, an object with chord length or centripetal parameterization permits more flexible texture mapping, in which each piece of the surface is given a "piece" of the texture according to its relative size - bigger segment, bigger piece - such that the texture looks more uniform.
Texture mapping is discussed in greater detail in the Matter module.
|
A Face is a planar object made of curves and has no depth.

A face with holes in it is made up of an exterior curve and interior closed curves.
|
A surface is made up of a smaller surfaces bounded by parametric curves. Surfaces are ideal for round or curved objects because fewer points need to be defined. The objects look smoother and do not have a fixed definition, and you can change their resolution to increase detail or reduce rendering time.
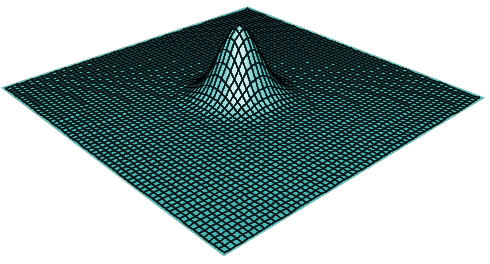
Points on surfaces have u and v parameters or coordinates, which measure along the surface itself. Thus, surfaces have both u and v directions, which can be opened/closed, cut, inverted, have rows added to them and so on.
|
As the name implies, a Polygon Mesh is an object made of polygons.

Each polygon is a 2D planar surface enclosed by straight line segments.
To create a smooth object surface out of straight lines depends on the number of polygons defined.
For more information on polygon mesh objects, see the Polygon Mesh reference page.
|
A Meta-clay object is composed of meta-elements grouped as meta-systems.
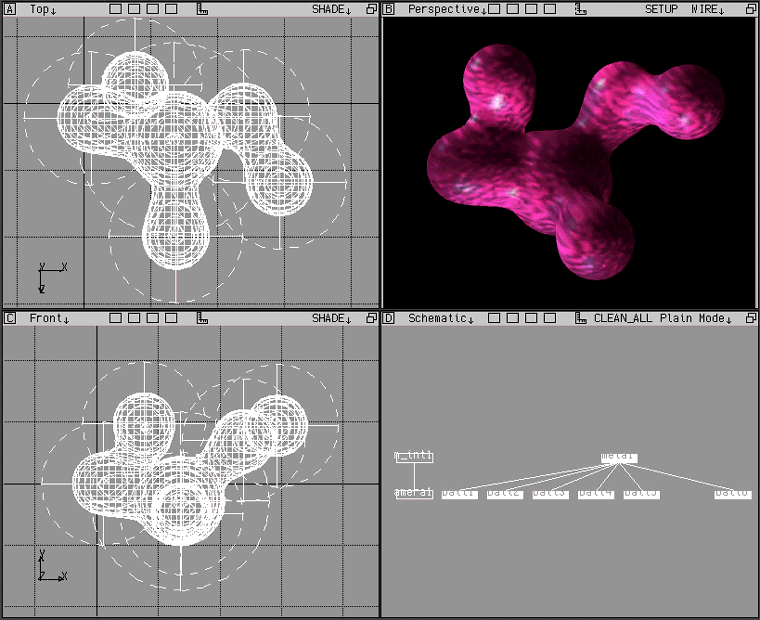
A Meta-System can have various numbers of Meta-Elements . Each meta-element has a solid core surrounded by an area of influence.
The area of influence decides the way the meta-elements blend together.
The Actor module contains an example of meta-clay elements used with Rigid Envelopes.
|
There are many methods of manipulating an object based on its relationship with other objects in the scene. The basics are :
This section demonstrates the methods of manipulating objects, to their desired size, orientation, and position.
|
![]()
The size of an object is thought of as its scale. When an object is created, its scale is automatically set to 1.0. An object is scaled from its centre. The values related to scaling are called factors.
There are three scaling modes:
NOTE: These scaling modes work similarly for the polygon (POL), 2D texture (TXT) and center (CTR) modes.
|
![]()
The orientation of an object is set by the rotation of its centre. All possible orientations can be set with a combination of three axes of rotation: x-axis, y-axis, and z-axis.
There are five modes for rotation:
NOTE: These rotation modes work similarly for the polygon (POL), 2D texture (TXT) and center (CTR) modes.
|
![]()
The location of an object is defined by points in space. These points are defined by three coordinates on the Cartesian axes of x, y, z. (To review Cartesian coordinates take this link back to BASIC 3D.)
When you move an object, you are changing its coordinates.
There are five modes for translation:
NOTE: These translation modes work similarly for the polygon (POL), 2D texture (TXT) and center (CTR) modes.
|
Objects can be grouped together in a hierarchy to make object manipulation easier or to share materials.
This is normally referred to as parenting. In a hierarchy, there is a parent, the children, the children's children, and so on.
One way to understand the concept of hierarchy is to compare it to a tree.

There is a trunk (parent); the branches (children), and the leaves (children's children).
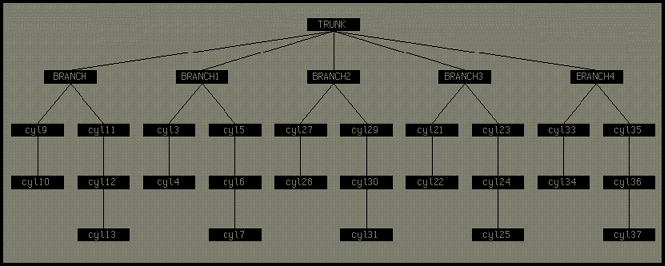
By moving the tree, all of the branches and the leaves move with it.
If you move a branch, its leaves move accordingly. If you move a single leaf, only that leaf moves. Leaves are usually called nodes in SOFTIMAGE 3D.
|
Object Instantiation is a useful method of quickly duplicating an object to produce many identical instances of it.

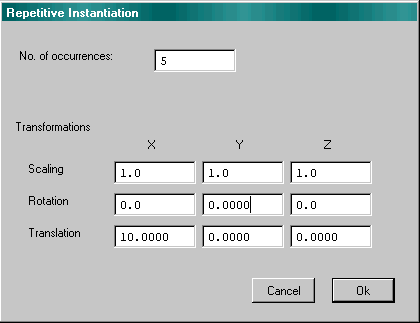
The principle is to create one object and then create many virtual instances which
"point to" the single master.
Almost any change you make to the master is automatically reflected in its instances.
This means faster model editing and reduced storage space consumption.
|
In relational modelling, there is a direct relationship between a generator (or generators) and an object which is generated from it (them). The generator can be a curve, a surface, or a face.
When you modify the generator, for example by scaling or moving points, the changes are automatically reflected on the generated object This makes modelling simple and quick, eliminating many time-consuming editing steps. Shape animation with relational modelling is also effortless.
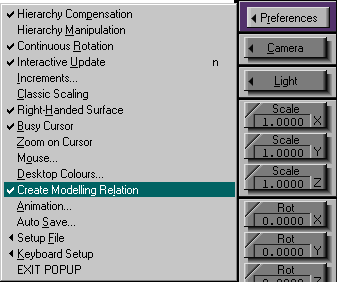 How
to Use Modelling Relationships
How
to Use Modelling Relationships You must select the Preferences->Create Modelling Relation command.
Starting with a "generator", you can create a "generated object" using any of the following operations:
Any operation that you perform on the generator is reflected on the generated object. For example, if you inverse the generator, you will inverse the normals of the generated object; if you move points on the generator, this will modify the geometry of the generated object.
To see the links between the generator and the resulting object, open a Schematic window view and select the Model mode.
The link between the generated object and its generator is displayed and labelled, for example, Extrusion.
You can break the modelling relationship between the generator and the generated object at any time, using the Effect->Freeze->Modelling Relation command. Once the relationship is frozen, modifications made to the generator no longer affect the generated object and you can manipulate each independently.
|
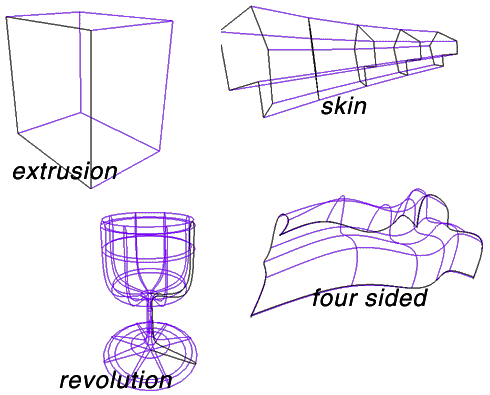
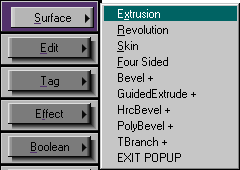 The Surface Menu Cell's commands let you create 3D objects
from curves.
The Surface Menu Cell's commands let you create 3D objects
from curves.
All commands work for NURBS. All commands also apply for relational modelling.
|
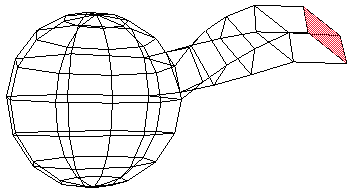
The Polygon (POL) manipulation mode lets you manipulate or perform operations on individual polygons of a polygon mesh object, such as an extrusion. This adds a huge increase in the flexibility in modelling effects.
Last updated 04-dec-1998