 The
Actor module allows you to use a sophisticated set of tools to create life-like figure and
character animation.
The
Actor module allows you to use a sophisticated set of tools to create life-like figure and
character animation.
|
The
Actor module allows you to use a sophisticated set of tools to create life-like figure and
character animation.
Actor's powerful tools provide you with a high level of control and flexibility.
It allows you to animate objects and hierarchical models quickly and
easily.
|

Articulated/Kinematic chains are controls available in SOFTIMAGE 3D to animate a 3D object. These chains look a lot like your own body skeleton. Articulated chain have an influence on the points that compose a 3D object. When you move a chain connected to an object you are modifying its shape; when you keyframe the chain motion you are animating the object under the influence of that chain.
Kinematics theories are used for computing the chain animation and behavior. Kinematics is the concept of relative motion between connected objects in space. For example, if a series of objects are connected together in a chain, any manipulation of an element will have repercussions along the rest of chain.
You can use either forward or inverse kinematics.
Inverse kinematics provides a quick and easy way to create animation: you define the goal of the action by positioning the end element of the chain and SOFTIMAGE figures out how to position the rest of the chain in order to reach this goal.
When you use forward kinematics, you are moving the skeleton into
position, specifying the angle of each element of the chain, and then keyframing these
positions. Each movement must be carefully planned to create the resulting animation.
Using forward kinematics, you have complete control over the orientation of each joint,
allowing you to create some movements that may not be possible to animate using inverse
kinematics alone.
|
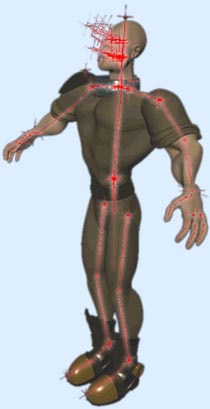
An articulated chain is a hierarchy made up of a chain root, a number of joints, and an end effector.

Its position and orientation influence the orientation of the rest of the chain, and it often contains information associated with the whole chain.
The root is displayed as a null model that can be selected. The default node name for a chain root is chn1 or chnn, as you can see in the Schematic representation above.
A joint is a link in an articulated chain.
The axis of rotation of a joint is called the origin. It is referred to as the origin because it is located at the point of articulation between two joints or between the first joint and the chain root, as you can see in the Schematic window above.
Inverse kinematics is invoked when you move the effector
In the windows, the effector is displayed as a null model that can be selected. The default node name for a chain effector is eff1 or effn.
|
Two kinds of Chain can be created: 2D and 3D.
Both types of chains can be rotated about the three local axes (like a ball joint) at the point of articulation when using simple forward kinematics and dynamic simulations.
When you invoke inverse kinematics, however, 2D and 3D chains behave differently.
 2D Chain
 When using inverse kinematics on a 2D chain , only the first joint can be rotated about the three local axes. (The first joint is the first joint that is created and is attached to the chain root).
The other joints in the chain can rotate only about the local z-axis. At their point of articulation (origin), their movement is similar to a hinge.
You can move the effector anywhere in 3D space, however the chain will always lie on a
single plane.
 3D Chain
 All joints in 3D chains , work like ball joints. They can be rotated about all three axes and can move around in any plane.
This makes 3D chains more flexible than 2D chains.
3D chains are best applied to models whose shape and movement are not restricted to a
plane- models which move freely in 3D space, such as swaying seaweed.
|
 Like other SOFTIMAGE 3D objects, articulated chains can be
grouped together to form a hierarchy, or skeleton .
Like other SOFTIMAGE 3D objects, articulated chains can be
grouped together to form a hierarchy, or skeleton .
You can also build hierarchies that combine articulated chain skeletons with other
SOFTIMAGE 3D objects or models to create more sophisticated characters.
|
 A chain or skeleton without skin can be seen in the windows, but
is not visible when rendered.
A chain or skeleton without skin can be seen in the windows, but
is not visible when rendered.
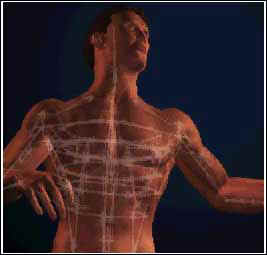
By using envelopes, you can assign any type of skin to a chain or skeleton. This allows you to create complex characters and models.
A skeleton with skin (an envelope) is referred to as an actor.
|
 A Local Envelope
is a flexible envelope that is a child of the skeleton root or first
joint of a chain. This means that it is associated with the chain's hierarchy.
A Local Envelope
is a flexible envelope that is a child of the skeleton root or first
joint of a chain. This means that it is associated with the chain's hierarchy.
Local envelopes are used to independently animate a part of a model. For example, if you want to create a dog with a wagging tail, you would use a local envelope for the tail.
Local envelopes are flexible by default.
|
 Global Envelopes are assigned to one or more
skeleton hierarchies. When they are assigned, they become the parent of the skeleton.
Global Envelopes are assigned to one or more
skeleton hierarchies. When they are assigned, they become the parent of the skeleton.
You can also nest a global envelope within another one.
Although the global envelope is the parent of the associated skeleton, it deforms according to the skeleton's movements.
Global envelopes are usually used to animate a model composed of several chains that
work together, such as a hand.
|
 The following
envelope types provide different degrees of deformation as well as control.
The following
envelope types provide different degrees of deformation as well as control.
Flexible envelopes provide better control on geometry, while rigid envelopes and joint models provide more control on transformations.
Rigid envelopes provide more control than joint models for joint
assignment.
|
 Flexible envelopes can be made
from any object that has geometry; that is, any object except a face or meta-clay element.
Flexible envelopes can be made
from any object that has geometry; that is, any object except a face or meta-clay element.
Characteristics
When assigned to skeleton chains, flexible envelopes map their vertices to the nearest skeleton joints. When assigned to skeleton objects, flexible envelopes map their vertices to the centre of the nearest skeleton object(s).
If you scale a skeleton, a flexible envelope is also rescaled accordingly. Flexible
envelopes offer more local control than rigid envelopes because you can tag their
vertices, reassign these vertices to different joints, and modify the weight of vertices
relative to one or more joints.
|
 Rigid envelopes are
similar to joint models because they can be any object and do not deform with the movement
of the joints, hence the name "rigid".
Rigid envelopes are
similar to joint models because they can be any object and do not deform with the movement
of the joints, hence the name "rigid".
They allow you to take advantage of the automatic blending of meta-clay objects, the ability to reassign envelopes to different joints, and the ability to weight the enveloping objects in relation to one or more joints.
To review information on meta-clay objects, follow this link back to the Model module.
|
 A Joint Model is
actually any object or model designated as an envelope by making it a child of a
particular joint in the chain.
A Joint Model is
actually any object or model designated as an envelope by making it a child of a
particular joint in the chain.
Like any other object, joint models can incorporate animation, such as shape and material animation.
Joint models follow the movements of their parent joint, but do not deform. As a
result, they are often used for animating mechanical assemblies or other objects and
characters with rigid limbs.
|

Dynamic Simulations can be incorporated into your animation by assigning physical properties to an object.
Dynamics allow you to create complex, realistic motions by simulating physical forces.
 You can create effects such as
wind, gravity, and force, or you can simulate collisions with obstacles.
You can create effects such as
wind, gravity, and force, or you can simulate collisions with obstacles.
For example, using dynamics, you can easily create an articulated chain swaying in the wind,
a task that would be very time-consuming to perform using keyframing.
|
 Quick Stretch can be used
to dynamically squash, bend, and stretch an object in relation to its own acceleration and
velocity.
Quick Stretch can be used
to dynamically squash, bend, and stretch an object in relation to its own acceleration and
velocity.
It lets you do "on the fly" deformation calculations which you can animate
It is a very quick and easy way to achieve cartoon-like animation effects.
Last updated 04-dec-1998