The viewing area of the SOFTIMAGE 3D display contains four windows. This is your
workspace. By default, one perspective projection and three parallel projection windows
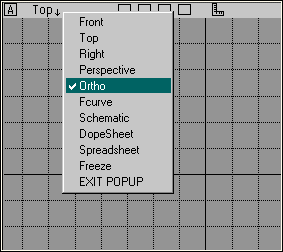
(Top, Front, and Right) are displayed as shown. Other windows such as Ortho, Fcurve,
Schematic, DopeSheet, and Spreadsheet can also be displayed.
 You
can change the default window or access the additional windows by clicking the window
title (such as Perspective). This displays a menu listing ten window options that are
described in detail starting on Top, Front, and Right Windows: Front, Top,
Right, Ortho, Perspective, Fcurve, Schematic, DopeSheet, and Spreadsheet. Freeze is not a
window type, but an option for using the windows - see Freeze Window.
You
can change the default window or access the additional windows by clicking the window
title (such as Perspective). This displays a menu listing ten window options that are
described in detail starting on Top, Front, and Right Windows: Front, Top,
Right, Ortho, Perspective, Fcurve, Schematic, DopeSheet, and Spreadsheet. Freeze is not a
window type, but an option for using the windows - see Freeze Window.
WINDOWS
|
Window
Title Bar Options
|
|
|
The window title bar contains a set of options which allow you to perform various
functions relating to the window, such as changing windows or view modes (shade,
wireframe, depthcue, etc.), changing the window's size, selecting it for rendering,
memorizing camera settings, and modifying the window's layout.
Letter Identifiers
A letter identifier (A, B, C, and D) appears in the upper-left corner of each of the
four windows to help simplify the way that the windows are referenced. Any window can
display any type of view. A refers to the upper-left window, B is the upper-right, C is
the lower-left, and D is the lower-right window.
Window Title
Clicking on the window title (such as Perspective) displays a menu listing the window
options: Front, Top, Right, Ortho, Perspective, Fcurve, Schematic, DopeSheet, and
Spreadsheet. These are described in detail starting on Top, Front, and Right
Windows. If you like, you can display more than one window of the same type. You
can also toggle between the previous and currently selected type of window by
middle-clicking the window title.
Right-click the window title on the left side of the title bar to activate or
deactivate a window. When a window is inactive, or "frozen," its title is
dimmed. A frozen window is not refreshed, so the display in the remaining active windows
is updated more quickly. You can also freeze a window by selecting the Freeze option from
this menu.
Memo Camera
The Memo Camera option allows you to memorize and retrieve up to four different camera
view settings in each window. This feature is especially useful for quickly toggling
between points of view while working on complex scenes.
- To enter the current camera setting into memory, middle-click one of the four boxes in
the window border. The box is filled to show a view has been saved.
- To retrieve (recall) one of the settings from memory, click the box representing the
desired setting.
- To cancel or reset the memory, right-click the desired box.
Tip:
You can recall a camera position by placing the cursor in the appropriate window and
pressing the Supra keys 1, 2, 3, and 4 to select the four memo cameras from left to right.
Sizing Icon
The sizing icon in the upper-right corner of each window resizes the window so that it
fills the entire screen (full view), a horizontal half-view (landscape), or vertical
half-view (portrait). You can easily toggle between these views and reduce the window to
its original size (quarter-view) at any time.
- To toggle between a quarter-view and full view, left-click the sizing icon.
- To toggle between a quarter-view and a landscape view, right-click the sizing icon.
- To toggle between a quarter-view and a portrait view, middle-click the sizing icon.
- To toggle between a half-view (portrait or landscape) and full view, left-click the
sizing icon.
Note:
You cannot toggle directly between the landscape and portrait views.
Layout
The ruler icon is used to change the window's layout. Selecting it with any mouse
button opens the Layout dialogue box. The Schematic window has different options than
those available for the other windows, but you open the dialogue box the same way (see
Schematic Layout).
The dialogue box options for all other window types allow you to modify the window grid
rulers, set point snaps using a set of Magnet options, set the fast play back mode for the
selected window, and activate a TurnTable option that allows you to move an orthographic
camera in the parallel projection windows.
Grid Lock
This option allows you to move an object (centre) or points by the exact amount set by
the grid size. This allows you to line up objects precisely. Always select this option for
X when using the Fcurve window. This avoids moving keyframes to a non-integer frame
(such as 4.87 or 34.26).
Tip:
You can also use the FcrvEdit->Set Keys on Frames command which makes every
frame an integer number.
Grid Size
This option sets the size of the grid for the grid lock in SOFTIMAGE units.
Grid Display
This option sets the size of the grid for the grid display in SOFTIMAGE units.
Grid Visible
This option shows or hides the grid.
Axis Visible
This option shows or hides the axis-reference icon in the lower-left corner of each
window.
TurnTable Visible
This option allows you to orbit an orthographic camera about one axis in any of the
orthogonal windows (Front, Top, or Right) so you can view your scene from various angles.
You can study your scene's overall "look" as you work, simply and quickly. You
can also use the Ortho window and orbit the camera using the o Supra key for a
similar effect.
To activate the TurnTable, select the check box next to the TurnTable visible
option. If you like, alter the incrementation step by changing the Angle increment
value.
The TurnTable control icon is displayed in the upper-right corner of a window.
Tip:
To display the TurnTable control icon in all three orthogonal windows, click the All
Views button at the bottom of the Layout dialogue box.
There are three ways to rotate the camera:
- Drag the point around the circle.
- Click the arrows to move the camera by increments (as specified by the Angle
increment value).
- Type the desired angle value directly into the text box in the centre of the circle.
To reset the orthographic camera to its default position (0.0), click the R
button.
When you select more than one object with the Multi menu cell, the orthographic
camera rotates around an average centre of the selected models, but the interest of the
camera remains at the centre of the selected model. To reset the orthographic interest,
click the R button or deactivate the TurnTable option altogether.
Note:
When the TurnTable option is deactivated, it is automatically reset to the default
position (0.0) with the point at the bottom of the circle.
Ruler Visible
This option shows or hides the rulers in the parallel projection windows (Top, Front,
and Right).
Field Guide
This option shows or hides the field guide on the Perspective window. This shows the
safe projection area, the safe action area, and the safe title area. These options help
compensate for differences between video and film, and are often used for title sequences.
The percentage of each option is 100, 90, and 80 percent respectively of full size for
the height and 133.333, 120, and 106 percent respectively for the width. These percentages
are the same for NTSC, PAL, and SECAM.
You can also set the field guides as you like with two environment variables in the .softimage
file (see the SOFTIMAGE 3D Installation Guide for more information). These
variables are:
- SI_SAFETITLE: This is the percentage of the full resolution image covered by the
safe title guide mark. For example,
SI_SAFETITLE = 80
means 80% of the image, which is the SMPT standard default.
- SI_SAFEACTION: This is the percentage of the full resolution image covered by the
safe action guide. For example, SI_SAFEACTION = 90
means 90% of the image, which is the SMPT standard default.
Magnet
This option allows you to snap points on the selected object as follows:
- Off: Point snaps are set off by default.
- On Point: When adding or moving a point, the point snaps to the nearest point on
an unselected object by default.
- On Tag: When adding or moving a point, the point snaps to the nearest tagged
point on an unselected object (by default).
You can specify that points snap to objects as follows:
- Unselected Objects: Points snap to points on unselected objects.
- All Visible Objects: Points snap to points on any visible object, including the
object containing the point you are moving.
Fast Play Back
Selecting the Fast play back option lets you quickly play back a wireframe
animation for the selected window. The animation is saved to a buffer and when played
again, it plays back much faster (the frame rate is maintained). When Fast play back
is active in one window, other windows are not updated during playback.
Tip:
Choose the PlayControl menu cell in the Motion module and set the Frame
Step to 1 for the first playback and then specify the frame rate.
The r Supra key resets the fast playback so that if it is interrupted, all
frames are recalculated. If you drag the time line pointer, the other windows are updated
when you release the pointer.
Fast playback remains active in shade or depthcue view modes. In a shade view, the
animated objects are displayed in wireframe until you stop the playback. In a depthcue
view, the animated objects are displayed in wireframe and without depthcue until you stop
the playback.
Tip:
To display your animation in real-time, choose the PlayControl menu
cell and set the Frame Step to zero. SOFTIMAGE 3D adjusts the frame step (skips
frames if necessary) so that your animation is played back in real-time when you select
the forward or backward arrow in the playback box.
All Views
This option sets the layout settings you have selected for all windows. The Layout
parameters for each window are saved when you save the scene.
You can create a default Setup File for the Layout parameters. For more information,
refer to the Preferences->Setup File command.
View Modes
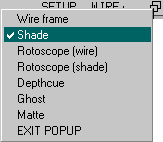 You can
select different viewing modes in which to display your scene. By default, the view mode
name displayed is SHADE. Clicking on this name displays a pull-down menu that lets you
access the Wireframe, Shade, Rotoscope (wire or shade), Depthcue, Ghost, or Matte view
modes, which are described on the following pages.
You can
select different viewing modes in which to display your scene. By default, the view mode
name displayed is SHADE. Clicking on this name displays a pull-down menu that lets you
access the Wireframe, Shade, Rotoscope (wire or shade), Depthcue, Ghost, or Matte view
modes, which are described on the following pages.
You can also toggle between the previous and currently selected view mode by
middle-clicking the view mode name displayed in the title bar.
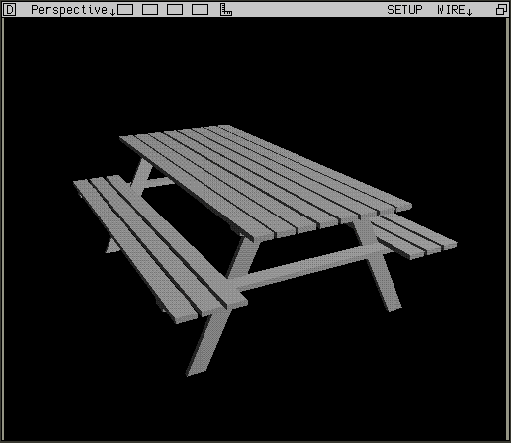
Wireframe View Mode
By default, the wireframe view mode is displayed in each window. A wireframe is an
image made up of the edges of objects, and drawn as lines resembling a model made of wire.
This image displays tracing features such as edges or contour lines without removing
invisible or hidden parts, or to fill surfaces.

Shade View Mode
Shade provides a quick-shaded (hardware shaded) view of your scene which closely
approximates its realistic "look," but does not show shadow, reflection, or
transparency. You can view icons for objects such as the lights, curves, and waves, and
you can also display textures.
Tip:
For a more realistic view of your scene, choose the Matter module's Preview
command. This lets you view special material attributes such as transparency,
reflectivity, and refraction.
To set up the Shade option, select it from the menu and then click SETUP in the
window's title bar. The Shade View Setup dialogue box is displayed.
Select this option to enable and disable the display of textures in the Shade view.
When this option is enabled, textures are drawn using the graphics capability of the
hardware and not SOFTIMAGE 3D.
- Affected Models: You can select to display textures for selected objects that
have a texture, or for all textured objects.
- Texture Repeat: Click Grid to enable the repeat factor of the texture (tiling).
Click None to disable the repeat factor. The texture repeat is disabled by default.
- Blending Approx: You can specify how to blend the material colour with the
texture colour. Without Mask ignores the alpha component of the texture, and Alpha
interprets the alpha component of the texture as a proportion of texture colour to use
against the material colour.
For more information about 2D textures, see the 2D Textures section of the Defining
Materials and Textures User's Guide.
You can select what types of textures you want to display in the shade view.
- Current Globals enables and disables the display of the current global texture of
all models (depending on the setting of Affected Models).
- Current Locals: All Materials enables and disables the display of the current
local textures for all materials. Current Materials allows you to enable or disable
the display of the current local textures of the current materials only. When this option
is enabled, the local textures associated with the "non-current" materials are
not displayed.
You can display icons such as curves and lights in the shade view by selecting this
option. The icons are always displayed in wireframe.
Select this option to enable and disable antialiasing on the scene. On an SGI Reality
Engine, antialiasing is handled by the hardware so there is no decrease in speed in the
shade view. However, for other platforms, antialiasing is implemented by SOFTIMAGE 3D,
which results in a significantly slower performance.
For information about using a garbage matte, see the Creating a Virtual Set with
Real and Computer-Generated Actors section of the Animating User's Guide.
- Select the Show Garbage Matte option to enable or disable the display of the
garbage matte in the shade view. The garbage matte is represented by the red areas of the
shade view.
The shade view supports infinite tiling of textures, meaning that the texture is
replicated on the object surface until the object is completely wrapped. To see the tiling
of a texture, scale it down so that it does not occupy the entire surface of the object.
Note:
You can only activate this option from the Spreadsheet window. See Options
Available Only from the Spreadsheet for details about activating the infinite tiling
option.
You can specify how the shade view is drawn when you are performing an interactive
operation such as zooming, orbiting, translating, or rotating.
- None: the scene is displayed in shade mode with textures.
- Shade: the scene is displayed in shade mode with no textures.
- Wireframe: the scene is displayed in wireframe mode.
- Surface Precision: This option allows you to specify the "surface step"
for all patch and NURBS surfaces displayed in the shade view. This setting does not affect
the actual step values of the objects in your scene. For example, you can set high step
values in the Info->Selection dialogue box for high quality rendered images
while setting a low surface precision in the shade view for a faster display. A surface
precision value of 0 uses whatever value is specified in the Info->Selection
dialogue box.
Rotoscope (Wireframe) and Rotoscope (Shade) View Mode
These two view modes allow you to perform rotoscoping in wireframe or shaded modes.
Rotoscoping is a technique in which individual frames of a video or film are imported into
SOFTIMAGE 3D and "traced."
The 2D background can be a static picture or a sequence of images. The scene can be
zoomed and panned while maintaining perfect registration with the background.
When zooming in the Perspective window, you must use the rectangle zoom option (Shift-z
Supra key) to define the zoom area; this takes a snapshot of the rectangular area and
magnifies it to fill the screen. The camera position does not change. You can then use the
zoom option (z Supra key) to pan, zoom in, and zoom out on the defined area. When
you pan, it has the effect of moving the snapshot in front of a still camera.
Note:
The Rotoscope view has two modes: locked and unlocked. When it is locked, the zoom
in/out and pan applies to both objects and images. To lock the view, do a rectangular
zoom. When the view is unlocked, the zoom in/out and pan has an effect only on objects. To
unlock the view, click on 1:1 in the window title bar.
The mouse buttons are configured as follows:
- Left mouse button pans.
- Middle mouse button zooms in.
- Right mouse button zooms out.
To reset the zoom or pan, select 1:1 displayed in the window title bar when the
rotoscope mode is active, or choose Camera->Reset.
Note:
You can use the forward or backward arrows to advance the sequence of your animation.
When you select the Rotoscope option, the Rotoscopy dialogue box is displayed for that
window.
- Select: This button opens a browser. You can select a file name instead of typing
the name in the text box beside this button. This is the file name of the picture to be
displayed as the background.
- Pixel ratio to 1.0: For images that have a different pixel ratio than 1.0,
SOFTIMAGE 3D scales it to 1.0 if you select this option. If you deselect this option, the
image is not scaled and the wireframe objects are adjusted to the pixel ratio of the
picture.
- Static: Only one image is used as the background.
- Sequence: A sequence is used as the background.
- Use Frame: Sets the starting and ending frames and the step of the background
image sequence for each frame of the actual scene.
- Sync Frame: Sets the frame number for the actual scene where the background image
sequence starts.
- Number of frames to keep in memory: Loads frames into a memory buffer so that you
can play a sequences of images without reloading the pictures each time you display them.
You can play back a sequence or move the time line pointer to quickly see the scene with
the background picture you're loading in. The first time the system displays a specific
frame, it reads it from the disk and keeps it in memory so that the next time you call up
this frame, the system simply has to draw the picture and the scene. You can specify the
number of frames stored into memory in the Original and Reduced text boxes.
- Original: Sets the buffer size of the original picture. This is an image that
fits into the quarter-window or displayed in the enlarged view when you maximize one
window to take up the full screen. If you have very large images, keep this buffer size
small to avoid too much memory swapping. Note that the original picture is always used
when you do a Rectangular zoom in to the scene.
- Reduced: Sets the buffer size for the pictures that have been reduced to fit in
the quarter-window.
Depthcue View Mode
The Depthcue view mode provides fast colour wire rendering. The portion of the model
closest to the camera appears "brighter" in colour, giving the sense of depth in
the z-axis. It is usually used to derive more visual feedback from the models displayed on
a screen because the hardware shading is often too slow for complex models and scenes.
By default, the object's colour outline fades as its distance from the camera
increases, although this effect can be reversed by selecting the Reverse Fading
option in the Depthcueing dialogue box that is displayed when you click SETUP.
Tip:
Tips for using Depthcue:
- You can change the colours of the wireframe objects by using the Colour box. For more
information, see The Wireframe Colour Box.
- In the Perspective window, use the Camera->Orbit or Camera->Dolly
command for the best visual feedback. In other windows, use the Turntable option (see
TurnTable Visible).
- When transforming a model for optimum viewing in a particular orthographic window, save
a temporary keyframe using SaveKey->Object->Transformation. For more
information, refer to the command descriptions on SaveKey->Object and FcrvReset,
respectively.
To set up the Depthcue shading option, select it from the view mode menu and then click
SETUP in the window's title bar. The Depth-cueing dialogue box is displayed.
- Min/Max According To Selected Object computes appropriate Start and End values
for a selected object to allow maximum contrast and fading.
- Min/Max According To Scene computes appropriate Start and End values for a
selected scene to allow maximum contrast and fading.
- Min/Max According To Clipping Planes computes the Start and End fading distance
values relative to the clipping plane settings to allow maximum contrast and fading.
- Min and Max displays the allowable slider range. When Selected Object
is selected, the minimum and maximum values represent the closest and furthest distance in
SOFTIMAGE units that the selected object is from either the global origin (in the Ortho
window) or the perspective camera (in the Perspective window).
When Scene is selected, the values represent the distance that the closest and
furthest objects in the scene are from either the world origin or the perspective camera.
In the Perspective window, when Clipping Plane is selected, the displayed values
are the same as the Near and Far settings in the Camera->Settings dialogue box.
They represent the closest and furthest distance that each clipping plane is from the
world origin or the perspective camera. The clipping plane settings must be changed in the
Camera Settings dialogue box. For more information on camera settings, see Camera->Settings.
Note:
For windows other than the Perspective window, the clipping planes are defined in the Window.rsrc
file. The near and Far clipping plane values cannot be changed interactively in SOFTIMAGE
3D, only from the Windows.rsrc file.
- Start and End: These sliders adjust the depthcue start and end points,
although they cannot be adjusted beyond the minimum and maximum values displayed above the
sliders. The Start value must always be less than the End value. If
necessary, the sliders automatically adjust to maintain this relationship. Start
corresponds to brightness and sets the near fall-off point of the depthcueing. End
corresponds to contrast and sets the far falloff point of the depthcueing.
Tip:
To find the desired brightness and contrast, try first setting the Start value
at a fairly low value, then finding the falloff point for the End value. Readjust
the Start value to attain the desired visual effect.
If you are working with Selected Object or Scene and you want to adjust the
sliders beyond the allowable minimum and maximum settings, move the sliders to the minimum
and maximum values, and then select Clipping Planes. This allows you to adjust the
sliders further.
- Reverse Fading: When activated, the visual depthcueing effect is reversed.
Objects further away from the perspective camera or global origin appear brighter than
those that are closer.
- Values Relative To confirms whether the values previously described are relative
to the global origin or the perspective camera. If you are working in an Ortho window, the
values are relative to the global origin. In the Perspective window, values are relative
to the perspective camera.
Three RGB sliders allow you to define the background colour.
Note:
The background colour and fading effect as they appear in the window may not accurately
represent the colour and fading in the rendered image. The colour displayed in the
Depthcueing dialogue box is a more accurate representation of the background when
rendered.
- Antialiasing switches hardware antialiasing on or off.
- Automatically Refresh View: When activated, the window is automatically refreshed
as you adjust parameters.
Ghost View Mode
The ghost view mode allows you to display a series of frozen snapshots of your animated
objects at the current frame, next keyframes, and previous keyframes. This option helps
you to view and edit your animation using traditional animation in-betweening techniques.
Keyframes are displayed by default, or you can select any frame in the animated
sequence to display as a static (reference) frame. By default, the current ghost keyframe
is white, the next two keyframes are violet, and the previous two keyframes are fuschia
pink.
You can customize the colours of Keys "Behind" and "Ahead," as well
as Frames "Behind" and "Ahead" in the Ghost Frames Setup dialogue box.
These frames remain in the view regardless of the position of the time line pointer and
are used to provide a reference point. You can then manipulate your objects and keyframe
their new values.
To set up the Ghost option, select it from the view mode menu and then click or
middle-click SETUP in the window title bar.
The Ghost Frames Setup dialogue box is displayed.
This scroll box displays a list of the current static frames and shows their associated
colours. The slider bar below the scroll box allows you to specify a frame number to be
included in the static frames list.
- Clear clears all selected frames from the list.
- Unselect removes the current selected frame from the list.
- Select adds the frame number specified to the list.
The Red, Green, and Blue (RGB) sliders allow you to colour the selected static frame, Frames
Behind and Ahead, and Keys Behind and Ahead.
The default number of frames Behind and Ahead is zero.
- Behind sets the number of frames you can see that are behind the current frame
(the frames that were already played). The default colour is red. To customize the colour,
use the RGB sliders.
- Ahead sets the number of frames you can see ahead of the current frame (the
upcoming frames). The default colour is blue. To customize the colour, use the RGB
sliders.
The default number of keys Behind and Ahead is 2.
- Show All Keys displays all frames corresponding to a keyframe.
- Behind sets the number of keyframes you can see that are behind the current frame
(the keyframes that were already played). The default colour is fuschia pink. To customize
the colour, use the RGB sliders.
- Ahead sets the number of keyframes you can see ahead of the current frame (the
upcoming keyframes). The default colour is violet. To customize the colour, use the RGB
sliders.
Note:
Supra keys r and R reset the fast playback frames.
Note:
On platforms that do not support 24 bitplanes in double buffered RGB mode, the
background colour may differ slightly from the wireframe view.
Matte View Mode
You can view the matte value layer of your scene in the Matte view mode. The matte
value of an object can have a value between 0 (black) and 1 (white). All the values
between 0 and 1 are shown as levels of grey.
For more information about setting the matte value of an object, see Info->Selection.
Last updated 03-apr-1998